> ## Documentation Index
> Fetch the complete documentation index at: https://intunedhq.com/docs/llms.txt
> Use this file to discover all available pages before exploring further.
# Quickstart: Build a scraper with code
export const CLICommandTabs = ({command, withOptions = true}) => {
if (!Array.isArray(command)) {
command = [command];
}
function mapAliases(aliases) {
return aliases.map((alias, index) => <>
{alias}
{index === 0 ? "" : " # Alias"}
{"\n\n"}
);
}
return
{mapAliases(command.map(cmd => `${cmd}${withOptions ? " [options]" : ""}`))}
{mapAliases(command.map(cmd => `uv run ${cmd}${withOptions ? " [options]" : ""}`))}
{mapAliases(command.map(cmd => `poetry run ${cmd}${withOptions ? " [options]" : ""}`))}
{mapAliases(command.map(cmd => `npm run ${cmd}${withOptions ? " -- [options]" : ""}`))}
{mapAliases(command.map(cmd => `yarn ${cmd}${withOptions ? " [options]" : ""}`))}
;
};
In this quickstart, you'll build a scraper by hand—writing the code, deploying it, configuring a Job, and running it end to end. It's designed to walk you through the core platform concepts: Projects, APIs, Runs, Jobs, and deployment.
If you'd rather skip the manual steps and have AI build your scraper, see the [Intuned Agent quickstart](/docs/00-getting-started/quickstarts/intuned-agent).
## Prerequisites
* An active Intuned account ([sign up here](https://app.intuned.io)). No credit card required—Intuned has a free plan
* Basic familiarity with TypeScript or Python
## Create and deploy your first scraper
You can develop Intuned Projects in two ways:
* **Hosted projects (online IDE)** — Zero setup. Write, test, and deploy directly from your browser.
* **Connected projects (local CLI)** — Develop locally with full version control and CI/CD integration.
Choose your preferred approach below.
1. Go to [app.intuned.io/projects](https://app.intuned.io/projects) and log in.
2. Select **Create Project**.
3. Select your language (TypeScript or Python).
4. Choose the **e-commerce-scrapingcourse** template.
5. Name it `ecommerce-scraper-quickstart`.
6. Ensure **Hosted project** is selected as Type.
7. Select **Create and Open**.
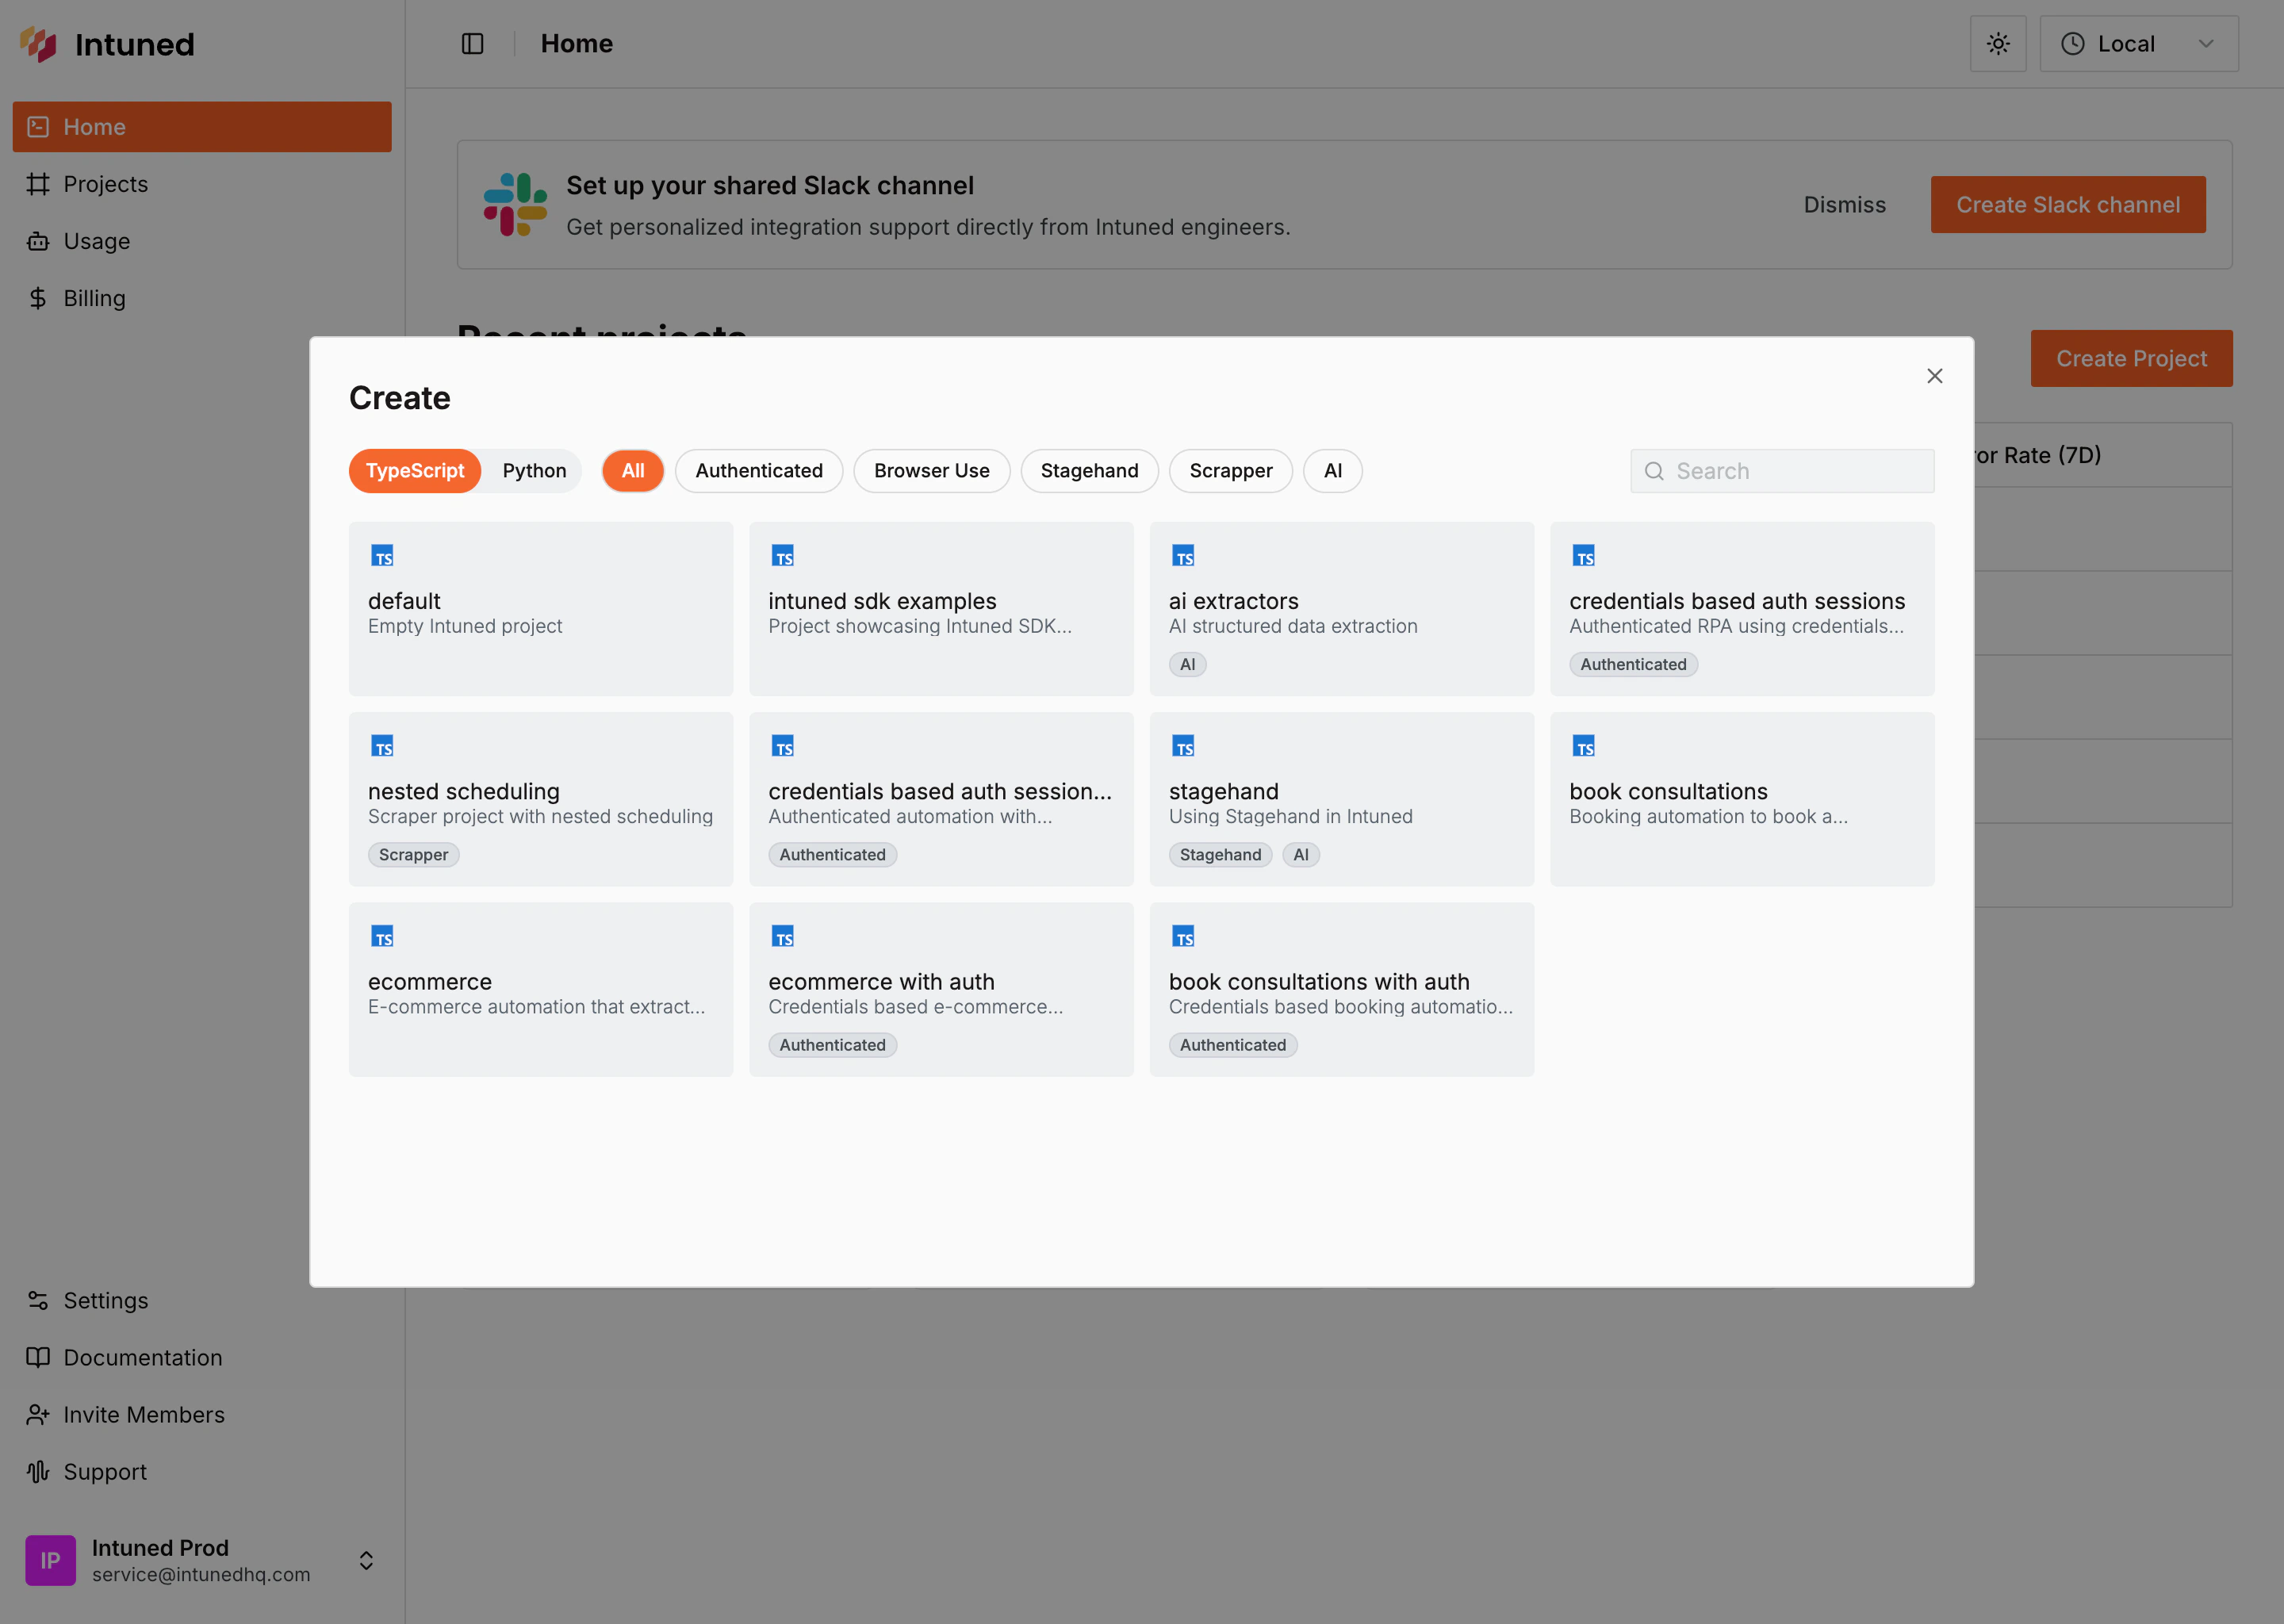 **Expected result:** The Intuned IDE opens with your project loaded.
> **What you just got:** An **Intuned Project** groups related browser automations together. Each file in the `api/` folder becomes a callable function that controls a browser using Playwright, accepts parameters, and returns structured results. When you deploy this project, all its APIs go live together as a single deployable unit.
In the file explorer, you'll see two API files:
**`api/list`** - Navigates the e-commerce site, extracts product info from all pages, and triggers `details` for each product found.
**`api/details`** - Visits each product page and extracts detailed information (price, SKU, descriptions, variants).
These two APIs work together—`list` discovers products and triggers `details` for each one using `extendPayload`. This pattern works well for job runs where the scope of work is determined at runtime, allowing your automation to adapt to whatever data it discovers.
Test the scraper's `list` API to see it working in real-time.
1. In the top toolbar, select **list** from the API dropdown.
2. Select **Params #1** next to it—you'll see empty params `{}`.
3. Select the **Run** button.
**Expected result:** The Intuned IDE opens with your project loaded.
> **What you just got:** An **Intuned Project** groups related browser automations together. Each file in the `api/` folder becomes a callable function that controls a browser using Playwright, accepts parameters, and returns structured results. When you deploy this project, all its APIs go live together as a single deployable unit.
In the file explorer, you'll see two API files:
**`api/list`** - Navigates the e-commerce site, extracts product info from all pages, and triggers `details` for each product found.
**`api/details`** - Visits each product page and extracts detailed information (price, SKU, descriptions, variants).
These two APIs work together—`list` discovers products and triggers `details` for each one using `extendPayload`. This pattern works well for job runs where the scope of work is determined at runtime, allowing your automation to adapt to whatever data it discovers.
Test the scraper's `list` API to see it working in real-time.
1. In the top toolbar, select **list** from the API dropdown.
2. Select **Params #1** next to it—you'll see empty params `{}`.
3. Select the **Run** button.
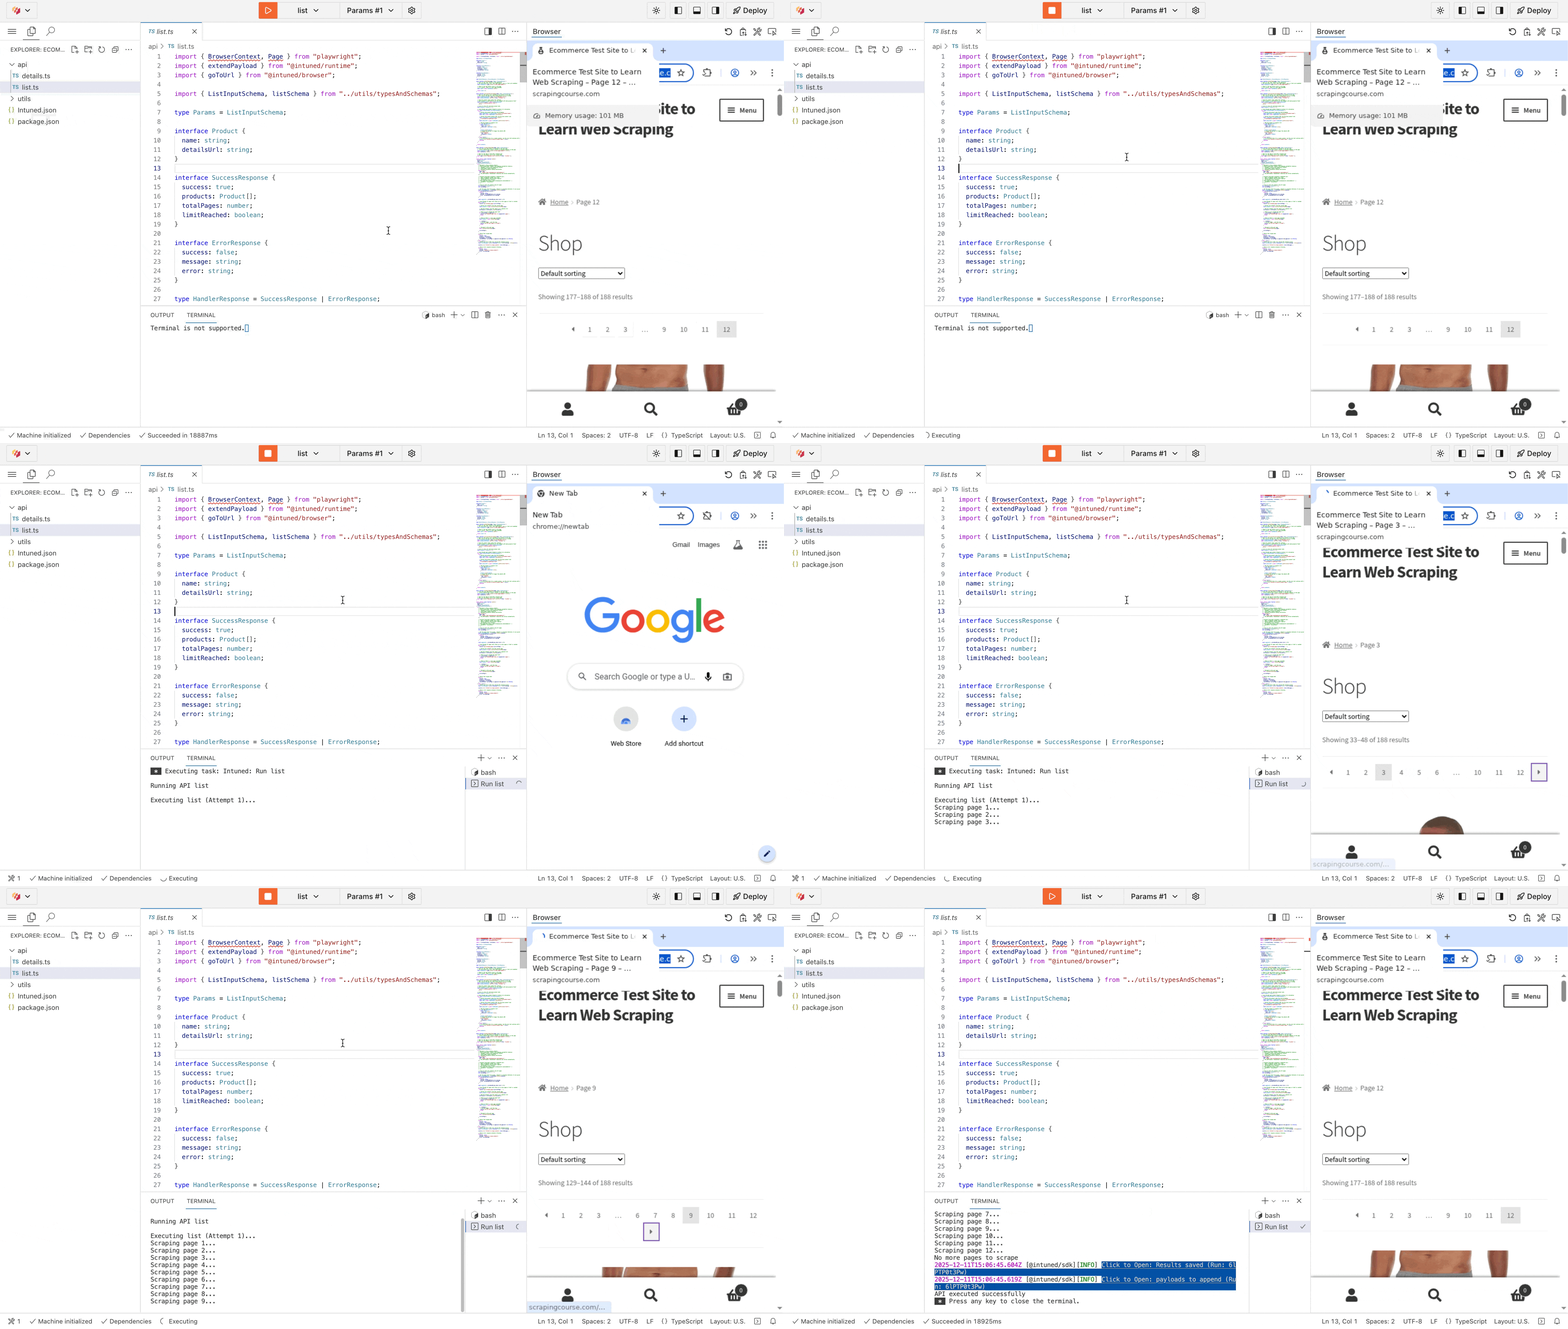 **Expected result:** The browser panel on the right shows the `list` scraper executing live. You'll see it navigate through all product pages, extract data, and paginate automatically. The terminal below what executed and the result of the Run.
```json theme={null}
{
"input": {},
"output": {
"products": [
{
"name": "Abominable Hoodie",
"detailsUrl": "https://www.scrapingcourse.com/ecommerce/product/abominable-hoodie/",
"imageUrl": "https://www.scrapingcourse.com/ecommerce/wp-content/uploads/2024/03/mh09-blue_main.jpg"
},
{
"name": "Adrienne Trek Jacket",
"detailsUrl": "https://www.scrapingcourse.com/ecommerce/product/adrienne-trek-jacket/",
"imageUrl": "https://www.scrapingcourse.com/ecommerce/wp-content/uploads/2024/03/wj08-gray_main.jpg"
},
{
"name": "Aeon Capri",
"detailsUrl": "https://www.scrapingcourse.com/ecommerce/product/aeon-capri/",
"imageUrl": "https://www.scrapingcourse.com/ecommerce/wp-content/uploads/2024/03/wp07-black_main.jpg"
}
// ... more products
]
}
}
```
**Extended payloads:** The IDE also displays a link to view the extended payloads created from this run. For each product found, you'll see a payload containing the API name `details` and the product parameters. These payloads represent additional runs that execute when running in a Job context.
```json theme={null}
[
{
"api": "details",
"parameters": {
"name": "Abominable Hoodie",
"detailsUrl": "https://www.scrapingcourse.com/ecommerce/product/abominable-hoodie/",
"imageUrl": "https://www.scrapingcourse.com/ecommerce/wp-content/uploads/2024/03/mh09-blue_main.jpg"
}
},
{
"api": "details",
"parameters": {
"name": "Adrienne Trek Jacket",
"detailsUrl": "https://www.scrapingcourse.com/ecommerce/product/adrienne-trek-jacket/",
"imageUrl": "https://www.scrapingcourse.com/ecommerce/wp-content/uploads/2024/03/wj08-gray_main.jpg"
}
},
// ... more extended payloads, one per product found
]
```
Deploy your scraper to Intuned's infrastructure.
1. Select the **Deploy** button in the top-right corner of the IDE.
2. In the deployment dialog, select **Deploy** to start.
3. Watch the live deployment logs until you see "Ready".
**Expected result:** A success message appears. Your scraper is now live and ready to run.
Now test your deployed scraper through the API Playground.
1. In the deployment success dialog, select **Run in Playground**.
2. In the Playground, you'll see your deployed API **list** ready to call.
3. The request body is pre-filled with test parameters. Select **Start Run** to execute.
The Playground is just an interactive way to test your deployed automation APIs. Your scraper is now callable from anywhere via API—use it from your application, service, or any HTTP client. See the [API Reference](/client-apis/api-reference) for authentication and programmatic usage.
**Expected result:** The scraper executes on Intuned's infrastructure. You'll see the run details and results in real-time.
Your scraper is now deployed and fully operational.
Open your terminal and run:
```bash theme={null}
npx create-intuned-project@latest
```
When prompted:
1. **Project name:** Enter `ecommerce-scraper-quickstart`.
2. **Language:** Select **TypeScript** or **Python**.
3. **Template:** Choose **e-commerce-scrapingcourse**.
4. **Your Workspace Id:** Check [here](/main/03-how-to/manage/manage-workspace) how to find it.
5. **Your API Key**: Check [here](/main/03-how-to/manage/manage-api-keys) how to create one.
**Expected result:** The CLI creates a new folder `ecommerce-scraper-quickstart/` with the project structure and installs dependencies.
> **What you just got:** An **Intuned Project** groups related browser automations together. Each file in the `api/` folder becomes a callable function that controls a browser using Playwright, accepts parameters, and returns structured results. When you deploy this project, all its APIs go live together as a single deployable unit.
```bash theme={null}
cd ecommerce-scraper-quickstart
```
Dependencies are installed automatically during project creation. If they weren't, install them manually:
* **TypeScript:** `yarn install`
* **Python:** `uv sync`
Open the `api/` folder in your code editor. You'll see two API files:
**`api/list`** - Navigates the e-commerce site, extracts product info from all pages, and triggers `details` for each product found.
**`api/details`** - Visits each product page and extracts detailed information (price, SKU, descriptions, variants).
These two APIs work together—`list` discovers products and triggers `details` for each one using `extendPayload`. This pattern works well for job runs where the scope of work is determined at runtime, allowing your automation to adapt to whatever data it discovers.
Test the scraper's `list` API to see it working on your machine.
Run the following command:
**Expected result:** The CLI launches a browser in the background. You'll see the scraped results in your terminal.
```json theme={null}
{
"input": {},
"output": {
"products": [
{
"name": "Abominable Hoodie",
"detailsUrl": "https://www.scrapingcourse.com/ecommerce/product/abominable-hoodie/",
"imageUrl": "https://www.scrapingcourse.com/ecommerce/wp-content/uploads/2024/03/mh09-blue_main.jpg"
},
{
"name": "Adrienne Trek Jacket",
"detailsUrl": "https://www.scrapingcourse.com/ecommerce/product/adrienne-trek-jacket/",
"imageUrl": "https://www.scrapingcourse.com/ecommerce/wp-content/uploads/2024/03/wj08-gray_main.jpg"
},
{
"name": "Aeon Capri",
"detailsUrl": "https://www.scrapingcourse.com/ecommerce/product/aeon-capri/",
"imageUrl": "https://www.scrapingcourse.com/ecommerce/wp-content/uploads/2024/03/wp07-black_main.jpg"
}
// ... more products
]
}
}
```
**Extended payloads:** The CLI also displays a summary of extended payloads created from this run. For each product found, you'll see a payload containing the API name `details` and the product parameters. These payloads represent additional runs that execute when running in a Job context.
```json theme={null}
[
{
"api": "details",
"parameters": {
"name": "Abominable Hoodie",
"detailsUrl": "https://www.scrapingcourse.com/ecommerce/product/abominable-hoodie/",
"imageUrl": "https://www.scrapingcourse.com/ecommerce/wp-content/uploads/2024/03/mh09-blue_main.jpg"
}
},
{
"api": "details",
"parameters": {
"name": "Adrienne Trek Jacket",
"detailsUrl": "https://www.scrapingcourse.com/ecommerce/product/adrienne-trek-jacket/",
"imageUrl": "https://www.scrapingcourse.com/ecommerce/wp-content/uploads/2024/03/wj08-gray_main.jpg"
}
}
// ... more extended payloads, one per product found
]
```
Deploy your scraper to Intuned's infrastructure.
Run the deployment command:
If your project uses environment variables or secrets, configure them in Intuned before deploying. Local `.env` files are only used during local development and are not included in deployments. Set shared values in [workspace environment variables](/main/02-features/environment-variables-secrets#workspace-level-environment-variables) or add them at the project level if they should only apply to this project.
**Expected result:** You see deployment progress logs, then:
```bash theme={null}
✓ Deployment successful
```
Your scraper is now live and ready to run.
Now test your deployed scraper through the API Playground.
1. Navigate to [Playground](https://app.intuned.io/playground) in your browser.
2. Select your project **ecommerce-scraper-quickstart** and the API **list**.
3. The request body is pre-filled with test parameters. Select **Start Run** to execute.
The Playground is just an interactive way to test your deployed automation APIs. Your scraper is now callable from anywhere via API—use it from your application, service, or any HTTP client. See the [API Reference](/client-apis/api-reference) for authentication and programmatic usage.
**Expected result:** The scraper executes on Intuned's infrastructure. You'll see the run details and results in real-time.
Your scraper is now deployed and fully operational.
## What's next?
* **[Jobs](/main/02-features/jobs-batched-executions)** — Jobs are the common way to run scrapers. Configure a schedule (daily, hourly, or custom) and define a sink to send your scraper results to a webhook, S3 bucket, or other destination.
* **[Authentication](/main/02-features/auth-sessions)** — For scrapers that require login, Intuned provides built-in authentication support. You define how to log in and how to verify a session, and Intuned handles the rest—validating sessions before runs, reusing them when possible, and recreating them when expired.
* **[Monitoring and traces](/main/02-features/observability-monitoring-logs)** — Every run generates detailed logs, browser traces, and session recordings. Use these tools to debug failures, verify your scraper is working correctly, and understand what happened during execution.
* **[Flexible automations](/main/02-features/flexible-automation)** — Build scrapers your way. Write deterministic code, use AI-driven extraction, or combine both in a hybrid approach. Use any library or package—Intuned is unopinionated by design.
* **[Intuned Agent quickstart](/main/00-getting-started/quickstarts/intuned-agent)** — You can write your scraper logic manually like in this quickstart, or use Intuned Agent to build it from a prompt. Intuned Agent can also help you update existing projects, fix failed runs, and iterate on your code faster.
* **[Cookbook](/main/01-learn/cookbook)** — Browse full working examples of scrapers and other automations. Each example includes complete code you can use as a starting point for your own projects.
* **[Online IDE](/main/02-features/online-ide)** — Learn more about the Intuned IDE used in this quickstart.
* **[Local development (CLI)](/main/02-features/local-development-cli)** — Learn more about the Intuned CLI used in this quickstart.
**Expected result:** The browser panel on the right shows the `list` scraper executing live. You'll see it navigate through all product pages, extract data, and paginate automatically. The terminal below what executed and the result of the Run.
```json theme={null}
{
"input": {},
"output": {
"products": [
{
"name": "Abominable Hoodie",
"detailsUrl": "https://www.scrapingcourse.com/ecommerce/product/abominable-hoodie/",
"imageUrl": "https://www.scrapingcourse.com/ecommerce/wp-content/uploads/2024/03/mh09-blue_main.jpg"
},
{
"name": "Adrienne Trek Jacket",
"detailsUrl": "https://www.scrapingcourse.com/ecommerce/product/adrienne-trek-jacket/",
"imageUrl": "https://www.scrapingcourse.com/ecommerce/wp-content/uploads/2024/03/wj08-gray_main.jpg"
},
{
"name": "Aeon Capri",
"detailsUrl": "https://www.scrapingcourse.com/ecommerce/product/aeon-capri/",
"imageUrl": "https://www.scrapingcourse.com/ecommerce/wp-content/uploads/2024/03/wp07-black_main.jpg"
}
// ... more products
]
}
}
```
**Extended payloads:** The IDE also displays a link to view the extended payloads created from this run. For each product found, you'll see a payload containing the API name `details` and the product parameters. These payloads represent additional runs that execute when running in a Job context.
```json theme={null}
[
{
"api": "details",
"parameters": {
"name": "Abominable Hoodie",
"detailsUrl": "https://www.scrapingcourse.com/ecommerce/product/abominable-hoodie/",
"imageUrl": "https://www.scrapingcourse.com/ecommerce/wp-content/uploads/2024/03/mh09-blue_main.jpg"
}
},
{
"api": "details",
"parameters": {
"name": "Adrienne Trek Jacket",
"detailsUrl": "https://www.scrapingcourse.com/ecommerce/product/adrienne-trek-jacket/",
"imageUrl": "https://www.scrapingcourse.com/ecommerce/wp-content/uploads/2024/03/wj08-gray_main.jpg"
}
},
// ... more extended payloads, one per product found
]
```
Deploy your scraper to Intuned's infrastructure.
1. Select the **Deploy** button in the top-right corner of the IDE.
2. In the deployment dialog, select **Deploy** to start.
3. Watch the live deployment logs until you see "Ready".
**Expected result:** A success message appears. Your scraper is now live and ready to run.
Now test your deployed scraper through the API Playground.
1. In the deployment success dialog, select **Run in Playground**.
2. In the Playground, you'll see your deployed API **list** ready to call.
3. The request body is pre-filled with test parameters. Select **Start Run** to execute.
The Playground is just an interactive way to test your deployed automation APIs. Your scraper is now callable from anywhere via API—use it from your application, service, or any HTTP client. See the [API Reference](/client-apis/api-reference) for authentication and programmatic usage.
**Expected result:** The scraper executes on Intuned's infrastructure. You'll see the run details and results in real-time.
Your scraper is now deployed and fully operational.
Open your terminal and run:
```bash theme={null}
npx create-intuned-project@latest
```
When prompted:
1. **Project name:** Enter `ecommerce-scraper-quickstart`.
2. **Language:** Select **TypeScript** or **Python**.
3. **Template:** Choose **e-commerce-scrapingcourse**.
4. **Your Workspace Id:** Check [here](/main/03-how-to/manage/manage-workspace) how to find it.
5. **Your API Key**: Check [here](/main/03-how-to/manage/manage-api-keys) how to create one.
**Expected result:** The CLI creates a new folder `ecommerce-scraper-quickstart/` with the project structure and installs dependencies.
> **What you just got:** An **Intuned Project** groups related browser automations together. Each file in the `api/` folder becomes a callable function that controls a browser using Playwright, accepts parameters, and returns structured results. When you deploy this project, all its APIs go live together as a single deployable unit.
```bash theme={null}
cd ecommerce-scraper-quickstart
```
Dependencies are installed automatically during project creation. If they weren't, install them manually:
* **TypeScript:** `yarn install`
* **Python:** `uv sync`
Open the `api/` folder in your code editor. You'll see two API files:
**`api/list`** - Navigates the e-commerce site, extracts product info from all pages, and triggers `details` for each product found.
**`api/details`** - Visits each product page and extracts detailed information (price, SKU, descriptions, variants).
These two APIs work together—`list` discovers products and triggers `details` for each one using `extendPayload`. This pattern works well for job runs where the scope of work is determined at runtime, allowing your automation to adapt to whatever data it discovers.
Test the scraper's `list` API to see it working on your machine.
Run the following command:
**Expected result:** The CLI launches a browser in the background. You'll see the scraped results in your terminal.
```json theme={null}
{
"input": {},
"output": {
"products": [
{
"name": "Abominable Hoodie",
"detailsUrl": "https://www.scrapingcourse.com/ecommerce/product/abominable-hoodie/",
"imageUrl": "https://www.scrapingcourse.com/ecommerce/wp-content/uploads/2024/03/mh09-blue_main.jpg"
},
{
"name": "Adrienne Trek Jacket",
"detailsUrl": "https://www.scrapingcourse.com/ecommerce/product/adrienne-trek-jacket/",
"imageUrl": "https://www.scrapingcourse.com/ecommerce/wp-content/uploads/2024/03/wj08-gray_main.jpg"
},
{
"name": "Aeon Capri",
"detailsUrl": "https://www.scrapingcourse.com/ecommerce/product/aeon-capri/",
"imageUrl": "https://www.scrapingcourse.com/ecommerce/wp-content/uploads/2024/03/wp07-black_main.jpg"
}
// ... more products
]
}
}
```
**Extended payloads:** The CLI also displays a summary of extended payloads created from this run. For each product found, you'll see a payload containing the API name `details` and the product parameters. These payloads represent additional runs that execute when running in a Job context.
```json theme={null}
[
{
"api": "details",
"parameters": {
"name": "Abominable Hoodie",
"detailsUrl": "https://www.scrapingcourse.com/ecommerce/product/abominable-hoodie/",
"imageUrl": "https://www.scrapingcourse.com/ecommerce/wp-content/uploads/2024/03/mh09-blue_main.jpg"
}
},
{
"api": "details",
"parameters": {
"name": "Adrienne Trek Jacket",
"detailsUrl": "https://www.scrapingcourse.com/ecommerce/product/adrienne-trek-jacket/",
"imageUrl": "https://www.scrapingcourse.com/ecommerce/wp-content/uploads/2024/03/wj08-gray_main.jpg"
}
}
// ... more extended payloads, one per product found
]
```
Deploy your scraper to Intuned's infrastructure.
Run the deployment command:
If your project uses environment variables or secrets, configure them in Intuned before deploying. Local `.env` files are only used during local development and are not included in deployments. Set shared values in [workspace environment variables](/main/02-features/environment-variables-secrets#workspace-level-environment-variables) or add them at the project level if they should only apply to this project.
**Expected result:** You see deployment progress logs, then:
```bash theme={null}
✓ Deployment successful
```
Your scraper is now live and ready to run.
Now test your deployed scraper through the API Playground.
1. Navigate to [Playground](https://app.intuned.io/playground) in your browser.
2. Select your project **ecommerce-scraper-quickstart** and the API **list**.
3. The request body is pre-filled with test parameters. Select **Start Run** to execute.
The Playground is just an interactive way to test your deployed automation APIs. Your scraper is now callable from anywhere via API—use it from your application, service, or any HTTP client. See the [API Reference](/client-apis/api-reference) for authentication and programmatic usage.
**Expected result:** The scraper executes on Intuned's infrastructure. You'll see the run details and results in real-time.
Your scraper is now deployed and fully operational.
## What's next?
* **[Jobs](/main/02-features/jobs-batched-executions)** — Jobs are the common way to run scrapers. Configure a schedule (daily, hourly, or custom) and define a sink to send your scraper results to a webhook, S3 bucket, or other destination.
* **[Authentication](/main/02-features/auth-sessions)** — For scrapers that require login, Intuned provides built-in authentication support. You define how to log in and how to verify a session, and Intuned handles the rest—validating sessions before runs, reusing them when possible, and recreating them when expired.
* **[Monitoring and traces](/main/02-features/observability-monitoring-logs)** — Every run generates detailed logs, browser traces, and session recordings. Use these tools to debug failures, verify your scraper is working correctly, and understand what happened during execution.
* **[Flexible automations](/main/02-features/flexible-automation)** — Build scrapers your way. Write deterministic code, use AI-driven extraction, or combine both in a hybrid approach. Use any library or package—Intuned is unopinionated by design.
* **[Intuned Agent quickstart](/main/00-getting-started/quickstarts/intuned-agent)** — You can write your scraper logic manually like in this quickstart, or use Intuned Agent to build it from a prompt. Intuned Agent can also help you update existing projects, fix failed runs, and iterate on your code faster.
* **[Cookbook](/main/01-learn/cookbook)** — Browse full working examples of scrapers and other automations. Each example includes complete code you can use as a starting point for your own projects.
* **[Online IDE](/main/02-features/online-ide)** — Learn more about the Intuned IDE used in this quickstart.
* **[Local development (CLI)](/main/02-features/local-development-cli)** — Learn more about the Intuned CLI used in this quickstart.