> ## Documentation Index
> Fetch the complete documentation index at: https://intunedhq.com/docs/llms.txt
> Use this file to discover all available pages before exploring further.
# AuthSessions
> Build authenticated browser automations and manage login sessions in Intuned
## Overview
Many browser automations need login—internal tools, apps without APIs, user-specific data, back-office workflows. AuthSessions handle this by saving browser state (cookies, local storage, session tokens) after a successful login. Intuned validates this state before each Run and recreates it automatically when sessions expire.
## Setup
### 1. Enable AuthSessions for your project
1. Open `Intuned.json` in your project.
2. Set `authSessions.enabled` to `true` (or toggle **Enable AuthSessions** in the UI).
3. Two files are created: `auth-sessions/create` and `auth-sessions/check`.
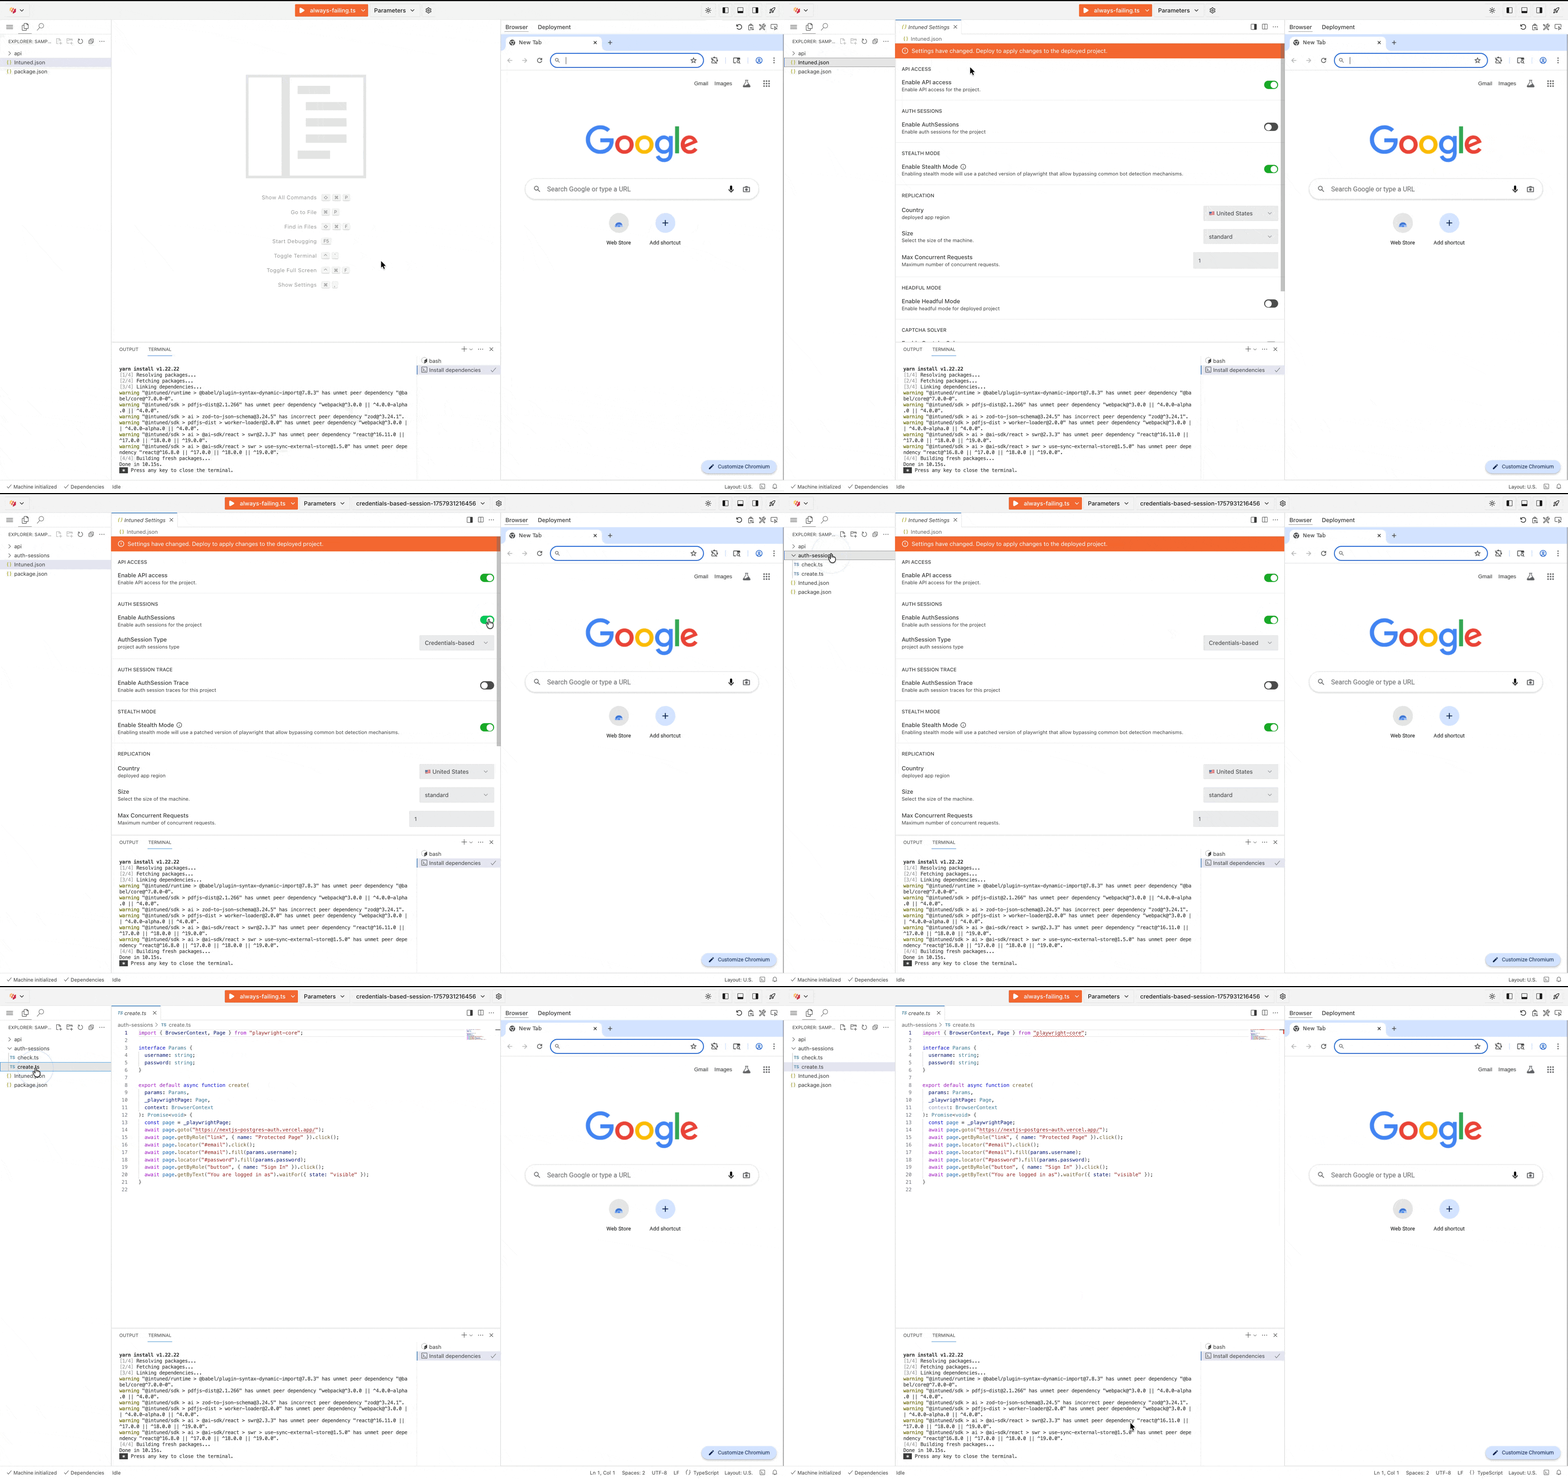 Once enabled, all APIs in the project require an AuthSession to run.
**1. Enable AuthSessions in configuration**
Open `Intuned.json` in your project and do the following changes to add the AuthSessions configuration:
* Set `authSessions.enabled` to `true`
* Set `authSessions.type` to `"API"`
* Ensure `apiAccess.enabled` is `true` (prerequisite for AuthSessions)
```json theme={null}
{
// ... other configuration ...
"authSessions": {
"enabled": true,
"type": "API"
},
"apiAccess": {
"enabled": true
}
}
```
**2. Create the auth-sessions directory and files**
```bash TypeScript theme={null}
mkdir -p auth-sessions
touch auth-sessions/create.ts auth-sessions/check.ts
```
```bash Python theme={null}
mkdir -p auth-sessions
touch auth-sessions/create.py auth-sessions/check.py
```
Once enabled, all APIs in the project require an AuthSession to run.
### 2. Implement the create API
The create API (`auth-sessions/create`) performs your login flow. It receives credentials and does whatever's needed to authenticate—navigate to login pages, fill forms, handle redirects. After it completes, Intuned captures the browser state.
```typescript auth-sessions/create.ts theme={null}
import { BrowserContext, Page } from "playwright";
import { goToUrl } from "@intuned/browser";
export interface CreateParams {
username: string;
password: string;
}
export default async function create(
params: CreateParams,
page: Page,
context: BrowserContext
): AsyncGenerator {
await goToUrl({ page, url: "https://opensource-demo.orangehrmlive.com/" });
await page.getByPlaceholder("Username").fill(params.username);
await page.getByPlaceholder("Password").fill(params.password);
await page.getByRole("button", { name: "Login" }).click();
await page.waitForURL(
"https://opensource-demo.orangehrmlive.com/web/index.php/dashboard/index"
);
}
```
```python auth-sessions/create.py theme={null}
from playwright.async_api import Page
from typing import TypedDict
class Params(TypedDict):
username: str
password: str
async def create(page: Page, params: Params | None = None, **_kwargs):
await page.goto("https://opensource-demo.orangehrmlive.com/")
await page.get_by_placeholder("Username").fill(params["username"])
await page.get_by_placeholder("Password").fill(params["password"])
await page.get_by_role("button", name="Login").click()
await page.wait_for_url(
"https://opensource-demo.orangehrmlive.com/web/index.php/dashboard/index"
)
```
### 3. Implement the check API
The check API (`auth-sessions/check`) validates that a session is still authenticated. It runs before every Run to ensure your automation never executes with invalid credentials.
```typescript auth-sessions/check.ts theme={null}
import { BrowserContext, Page } from "playwright";
import { goToUrl } from "@intuned/browser";
export default async function check(
page: Page,
context: BrowserContext
): Promise {
await goToUrl({
page,
url: "https://opensource-demo.orangehrmlive.com/web/index.php/dashboard/index",
});
const redirectedToLogin =
page.url() ===
"https://opensource-demo.orangehrmlive.com/web/index.php/auth/login";
return !redirectedToLogin;
}
```
```python auth-sessions/check.py theme={null}
from playwright.async_api import Page
async def check(page: Page, **_kwargs) -> bool:
await page.goto(
"https://opensource-demo.orangehrmlive.com/web/index.php/dashboard/index"
)
redirected_to_login = (
page.url
== "https://opensource-demo.orangehrmlive.com/web/index.php/auth/login"
)
return not redirected_to_login
```
**Tips for the check API:**
* Target lightweight pages or specific elements—avoid heavy page loads
* Check for content that only appears when authenticated (user menu, account name)
* Don't just check for absence of login form—verify presence of authenticated content
* If the project handles more than one login flow on the same site (for example, different roles or user types that land on different post-login screens), read the parameters that were passed to `create` with [`getAuthSessionParameters`](/main/05-references/runtime-sdk-typescript/get-auth-session-parameters) and branch the check accordingly
### 4. Create an AuthSession
Once you have deployed your project with the create and check APIs, you can create an AuthSession and use it in your Runs. Check the deployment documentation if you need help deploying your project.
The following examples show how to create an AuthSession via API, dashboard, or code.
```typescript create-intuned-auth-session.ts theme={null}
import { IntunedClient } from "@intuned/client";
const intunedClient = new IntunedClient({
workspaceId: "123e4567-e89b-12d3-a456-426614174000",
apiKey: process.env["INTUNED_API_KEY"] ?? "",
});
async function run() {
const result = await intunedClient.projects.authSessions.create.start("my-project", {
parameters: {
"username": "john.doe",
"password": "password",
},
proxy: "http://proxy.example.com:8080",
});
console.log(result);
}
run();
```
```python create-intuned-auth-session.py theme={null}
from intuned_client import IntunedClient
from intuned_client import models
import os
with IntunedClient(
workspace_id="123e4567-e89b-12d3-a456-426614174000",
api_key=os.getenv("INTUNED_API_KEY", ""),
) as ic_client:
res = ic_client.projects.auth_sessions.create.start(
project_name="my-project",
body=models.AuthSessionsCreateStartRequestBody(
parameters={
"username": "john.doe",
"password": "password",
},
id="auth-session-123",
proxy="http://proxy.example.com:8080",
create_attempts=3,
check_attempts=3,
save_trace=True,
),
)
# Handle response
print(res)
```
```bash create-intuned-auth-session.sh theme={null}
#!/bin/bash
curl --request POST \
--url https://app.intuned.io/api/v1/workspace/{workspaceId}/projects/{projectName}/auth-sessions/create \
--header 'Content-Type: application/json' \
--header 'x-api-key: ' \
--data '
{
"id": "auth-session-123",
"parameters": {
"username": "john.doe",
"password": "password"
},
"proxy": "http://proxy.example.com:8080",
"createAttempts": 3,
"checkAttempts": 3,
"saveTrace": true,
"requestTimeout": 60000
}
'
```
Check the [AuthSessions Create API Playground](/client-apis/api-reference/projectsauthsessionscreate/create-authsession--start) for more details on creating AuthSessions via API.
1. Go to the **AuthSessions** tab in your project.
2. Select **New AuthSession**.
3. Enter credentials (and proxy if needed).
4. Select **Save**.
Once enabled, all APIs in the project require an AuthSession to run.
**1. Enable AuthSessions in configuration**
Open `Intuned.json` in your project and do the following changes to add the AuthSessions configuration:
* Set `authSessions.enabled` to `true`
* Set `authSessions.type` to `"API"`
* Ensure `apiAccess.enabled` is `true` (prerequisite for AuthSessions)
```json theme={null}
{
// ... other configuration ...
"authSessions": {
"enabled": true,
"type": "API"
},
"apiAccess": {
"enabled": true
}
}
```
**2. Create the auth-sessions directory and files**
```bash TypeScript theme={null}
mkdir -p auth-sessions
touch auth-sessions/create.ts auth-sessions/check.ts
```
```bash Python theme={null}
mkdir -p auth-sessions
touch auth-sessions/create.py auth-sessions/check.py
```
Once enabled, all APIs in the project require an AuthSession to run.
### 2. Implement the create API
The create API (`auth-sessions/create`) performs your login flow. It receives credentials and does whatever's needed to authenticate—navigate to login pages, fill forms, handle redirects. After it completes, Intuned captures the browser state.
```typescript auth-sessions/create.ts theme={null}
import { BrowserContext, Page } from "playwright";
import { goToUrl } from "@intuned/browser";
export interface CreateParams {
username: string;
password: string;
}
export default async function create(
params: CreateParams,
page: Page,
context: BrowserContext
): AsyncGenerator {
await goToUrl({ page, url: "https://opensource-demo.orangehrmlive.com/" });
await page.getByPlaceholder("Username").fill(params.username);
await page.getByPlaceholder("Password").fill(params.password);
await page.getByRole("button", { name: "Login" }).click();
await page.waitForURL(
"https://opensource-demo.orangehrmlive.com/web/index.php/dashboard/index"
);
}
```
```python auth-sessions/create.py theme={null}
from playwright.async_api import Page
from typing import TypedDict
class Params(TypedDict):
username: str
password: str
async def create(page: Page, params: Params | None = None, **_kwargs):
await page.goto("https://opensource-demo.orangehrmlive.com/")
await page.get_by_placeholder("Username").fill(params["username"])
await page.get_by_placeholder("Password").fill(params["password"])
await page.get_by_role("button", name="Login").click()
await page.wait_for_url(
"https://opensource-demo.orangehrmlive.com/web/index.php/dashboard/index"
)
```
### 3. Implement the check API
The check API (`auth-sessions/check`) validates that a session is still authenticated. It runs before every Run to ensure your automation never executes with invalid credentials.
```typescript auth-sessions/check.ts theme={null}
import { BrowserContext, Page } from "playwright";
import { goToUrl } from "@intuned/browser";
export default async function check(
page: Page,
context: BrowserContext
): Promise {
await goToUrl({
page,
url: "https://opensource-demo.orangehrmlive.com/web/index.php/dashboard/index",
});
const redirectedToLogin =
page.url() ===
"https://opensource-demo.orangehrmlive.com/web/index.php/auth/login";
return !redirectedToLogin;
}
```
```python auth-sessions/check.py theme={null}
from playwright.async_api import Page
async def check(page: Page, **_kwargs) -> bool:
await page.goto(
"https://opensource-demo.orangehrmlive.com/web/index.php/dashboard/index"
)
redirected_to_login = (
page.url
== "https://opensource-demo.orangehrmlive.com/web/index.php/auth/login"
)
return not redirected_to_login
```
**Tips for the check API:**
* Target lightweight pages or specific elements—avoid heavy page loads
* Check for content that only appears when authenticated (user menu, account name)
* Don't just check for absence of login form—verify presence of authenticated content
* If the project handles more than one login flow on the same site (for example, different roles or user types that land on different post-login screens), read the parameters that were passed to `create` with [`getAuthSessionParameters`](/main/05-references/runtime-sdk-typescript/get-auth-session-parameters) and branch the check accordingly
### 4. Create an AuthSession
Once you have deployed your project with the create and check APIs, you can create an AuthSession and use it in your Runs. Check the deployment documentation if you need help deploying your project.
The following examples show how to create an AuthSession via API, dashboard, or code.
```typescript create-intuned-auth-session.ts theme={null}
import { IntunedClient } from "@intuned/client";
const intunedClient = new IntunedClient({
workspaceId: "123e4567-e89b-12d3-a456-426614174000",
apiKey: process.env["INTUNED_API_KEY"] ?? "",
});
async function run() {
const result = await intunedClient.projects.authSessions.create.start("my-project", {
parameters: {
"username": "john.doe",
"password": "password",
},
proxy: "http://proxy.example.com:8080",
});
console.log(result);
}
run();
```
```python create-intuned-auth-session.py theme={null}
from intuned_client import IntunedClient
from intuned_client import models
import os
with IntunedClient(
workspace_id="123e4567-e89b-12d3-a456-426614174000",
api_key=os.getenv("INTUNED_API_KEY", ""),
) as ic_client:
res = ic_client.projects.auth_sessions.create.start(
project_name="my-project",
body=models.AuthSessionsCreateStartRequestBody(
parameters={
"username": "john.doe",
"password": "password",
},
id="auth-session-123",
proxy="http://proxy.example.com:8080",
create_attempts=3,
check_attempts=3,
save_trace=True,
),
)
# Handle response
print(res)
```
```bash create-intuned-auth-session.sh theme={null}
#!/bin/bash
curl --request POST \
--url https://app.intuned.io/api/v1/workspace/{workspaceId}/projects/{projectName}/auth-sessions/create \
--header 'Content-Type: application/json' \
--header 'x-api-key: ' \
--data '
{
"id": "auth-session-123",
"parameters": {
"username": "john.doe",
"password": "password"
},
"proxy": "http://proxy.example.com:8080",
"createAttempts": 3,
"checkAttempts": 3,
"saveTrace": true,
"requestTimeout": 60000
}
'
```
Check the [AuthSessions Create API Playground](/client-apis/api-reference/projectsauthsessionscreate/create-authsession--start) for more details on creating AuthSessions via API.
1. Go to the **AuthSessions** tab in your project.
2. Select **New AuthSession**.
3. Enter credentials (and proxy if needed).
4. Select **Save**.
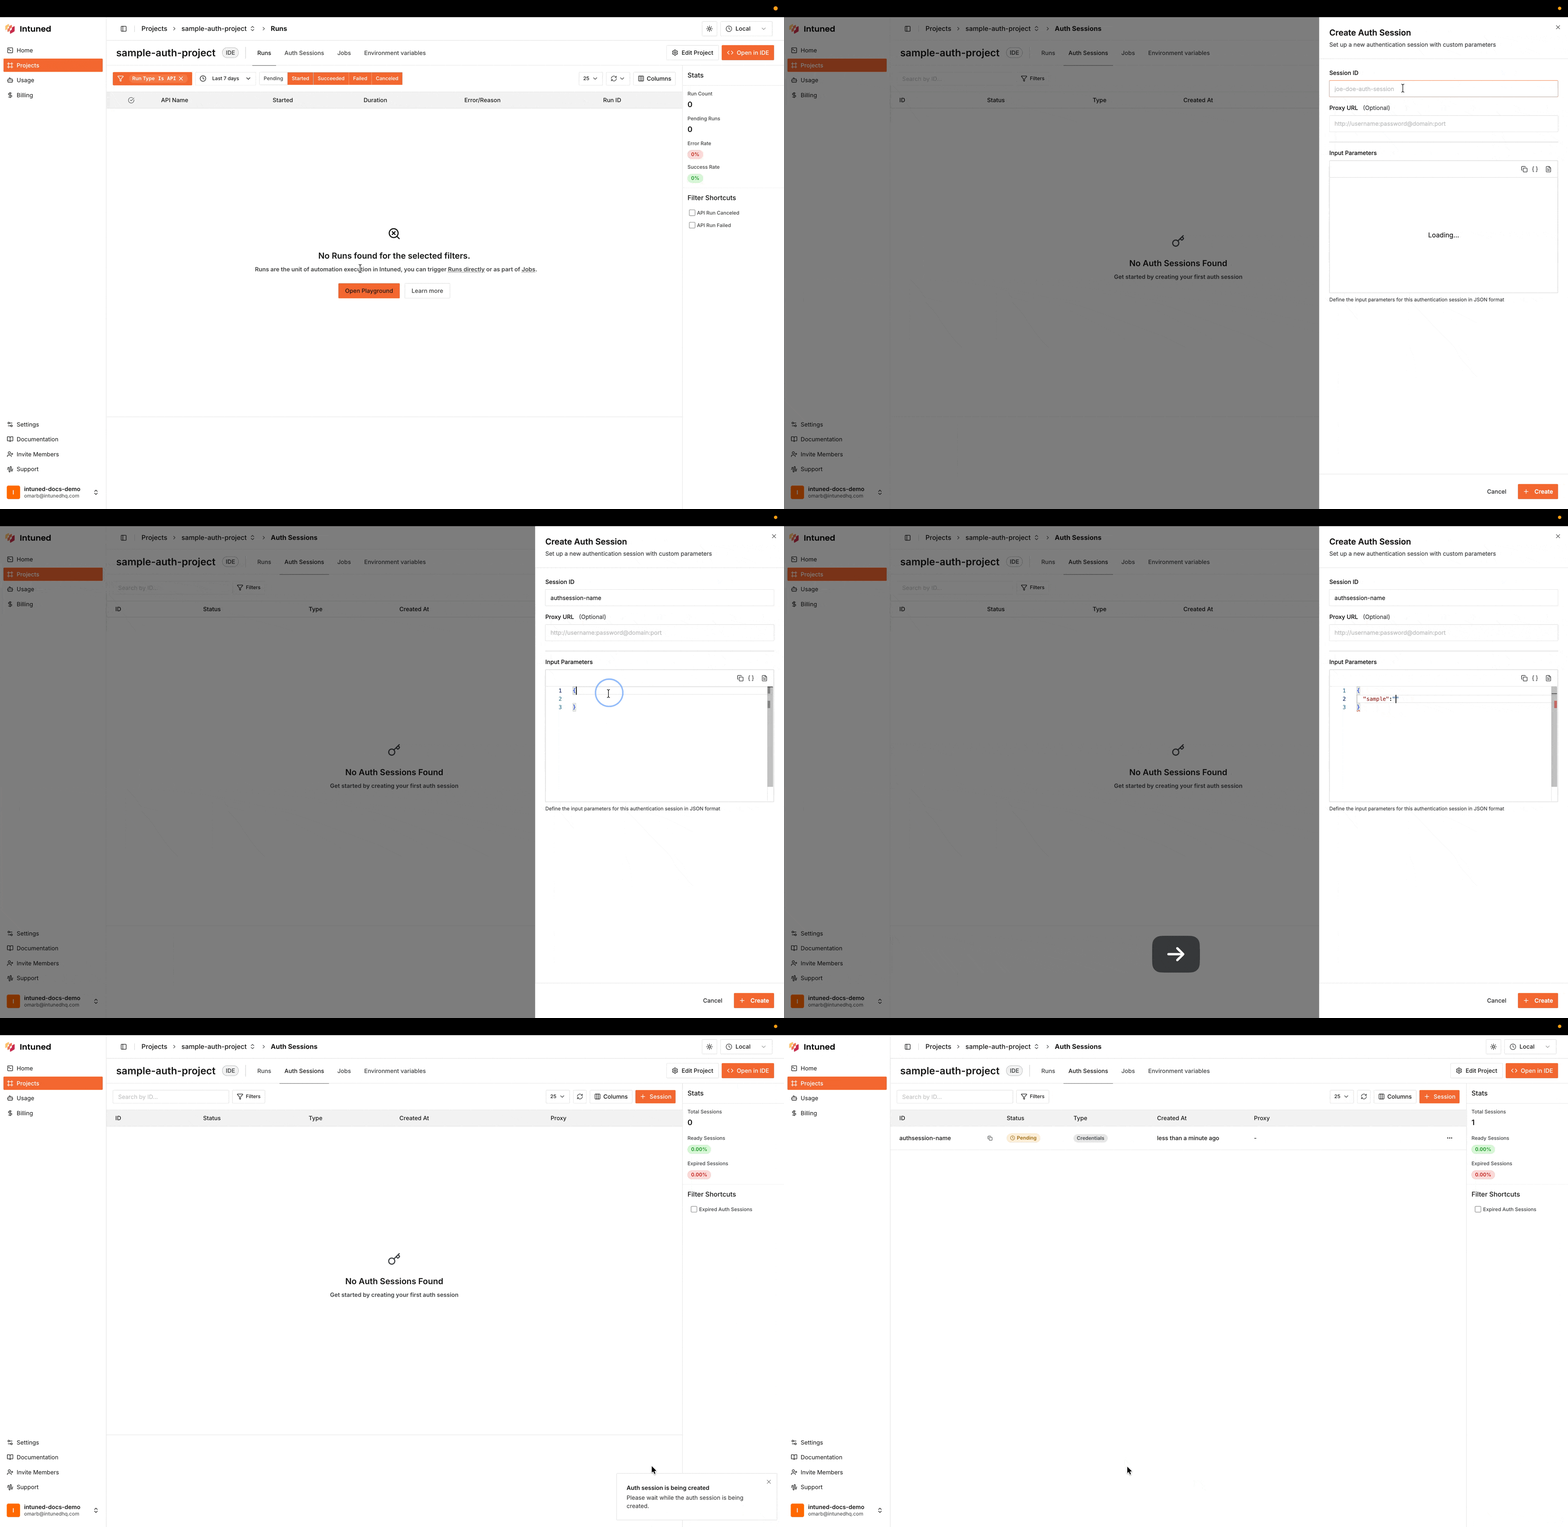 Run from your project directory (where Intuned Settings is located), or specify the project explicitly with `-p `.
```bash theme={null}
intuned platform authsessions create \
--input '{"username": "john.doe", "password": "password"}' \
--wait
```
Use `--proxy` to route traffic through a proxy:
```bash theme={null}
intuned platform authsessions create my-auth-session \
--input '{"username": "john.doe", "password": "password"}' \
--proxy "http://proxy.example.com:8080" \
--wait
```
The `--wait` flag waits for the auth session creation to complete (defaults to 10 minutes). The `--input` accepts a JSON string or a path to a JSON file prefixed with `@`:
```bash theme={null}
intuned platform authsessions create my-auth-session --input @credentials.json --wait
```
See [Auth Sessions Create](/main/05-references/cli/platform#auth-sessions-create) for all options.
Define AuthSession instances in `intuned-resources/auth-sessions/` and deploy them with your project. This is separate from the `auth-sessions/` directory, which still contains your `create` and `check` automation logic.
```jsonc intuned-resources/auth-sessions/test-auth-session.auth-session.jsonc theme={null}
{
"parameters": {
"username": "demo@email.com",
"password": "DemoUser2024!"
}
}
```
* `test-auth-session.auth-session.jsonc` creates an AuthSession with ID `test-auth-session`.
* `.json` and `.jsonc` are both supported.
* After deployment, the AuthSession appears in the **AuthSessions** tab with **Source** shown as `Created via code`.
* New and updated code-defined AuthSessions automatically trigger a create run, so they may appear as pending until they become ready.
* Update the file and redeploy to change the AuthSession.
* Remove the file and redeploy to delete the AuthSession. If it is currently used by an active Run or JobRun, deletion is skipped until it is no longer in use.
* Code-defined AuthSessions are read-only in the dashboard and API. Edit the file instead.
### 5. Use the AuthSession in your Runs
When starting a Run, specify the AuthSession to use. Here's an example of starting a Run with an existing AuthSession:
```typescript trigger-intuned-run-with-auth-session.ts theme={null}
import { IntunedClient } from "@intuned/client";
const intunedClient = new IntunedClient({
workspaceId: "123e4567-e89b-12d3-a456-426614174000",
apiKey: process.env["INTUNED_API_KEY"] ?? "",
});
async function run() {
const result = await intunedClient.projects.runs.start("my-project", {
parameters: {
"param1": "value1",
"param2": 42,
"param3": true,
},
api: "my-awesome-api",
authSession: {
id: "auth-session-123",
},
});
console.log(result);
}
run();
```
```python trigger-intuned-run-with-auth-session.py theme={null}
from intuned_client import IntunedClient
from intuned_client import models
import os
with IntunedClient(
workspace_id="123e4567-e89b-12d3-a456-426614174000",
api_key=os.getenv("INTUNED_API_KEY", ""),
) as ic_client:
res = ic_client.projects.runs.start(
project_name="my-project",
body=models.RunStartRequestBody(
parameters={
"param1": "value1",
"param2": 42,
"param3": True,
},
api="my-awesome-api",
auth_session={
"id": "auth-session-123"
},
),
)
# Handle response
print(res)
```
```bash trigger-intuned-run-with-auth-session.sh theme={null}
#!/bin/bash
curl --request POST \
--url https://app.intuned.io/api/v1/workspace/{workspaceId}/projects/{projectName}/run/start \
--header 'Content-Type: application/json' \
--header 'x-api-key: ' \
--data '
{
"api": "my-awesome-api",
"parameters": {
"param1": "value1",
"param2": 42,
"param3": true
},
"saveTrace": true,
"requestTimeout": 600,
"authSession": {
"id": "auth-session-123"
}
}
'
```
```bash intuned-cli theme={null}
intuned platform runs start '{
"api": "my-awesome-api",
"parameters": {
"param1": "value1",
"param2": 42,
"param3": true
},
"authSession": {
"id": "auth-session-123"
}
}'
```
Check the [Runs API Playground](/client-apis/api-reference/projectsruns/run-api--start) for more details on starting Runs via API.
That's it—Intuned validates the session before running your API and recreates it automatically if it's expired.
## How AuthSessions work
When you run an API in an AuthSession-enabled project:
1. **Validation**: Before your code runs, Intuned checks if the AuthSession is still authenticated by running your `check` API.
2. **Auto-recreation**: If validation fails and auto-recreation is enabled (the default), Intuned runs your `create` API to log in again, then re-validates.
3. **Execution**: Only after validation succeeds does your API code run.
This happens for every Run attempt, so your automation never runs with invalid credentials.
### AuthSession Runs in your project
AuthSession operations appear as special Run types in your Runs list:
| Run type | When it triggers | What it does |
| ---------------------- | --------------------------------------------------- | --------------------------------------------------------------------------------------- |
| `AuthSession:Validate` | Before each API Run attempt | Runs `check` API; if it fails and auto-recreate is on, runs `create` then `check` again |
| `AuthSession:Create` | When you create an AuthSession via dashboard or API | Runs `create` API, then `check` to confirm success |
| `AuthSession:Update` | When you update an AuthSession's credentials | Runs `create` with new credentials, then `check` to confirm |
If an `AuthSession:Validate` fails, the dependent API Run is canceled (not marked as failed).
For a detailed look at how AuthSessions integrate into Intuned's execution
model, see [Intuned in depth →
AuthSessions](/main/01-learn/deep-dives/intuned-indepth#authsessions).
## Usage patterns
AuthSessions support three common patterns:
**Single account automation:** One account performs multiple operations. Create a single AuthSession and use it to start all Runs. Good for internal tools where you scrape analytics, export reports, and update settings—each as a separate API, all sharing one AuthSession.
**Multi-account automation:** Each user has their own AuthSession. Your app creates an AuthSession when a user "connects" their account, then runs automations on their behalf. Good for tools like social media managers where each user connects their own account.
**Multiple login flows on the same site:** A single site exposes more than one login flow (for example, a healthcare portal with separate provider and patient logins, or an admin login alongside an end-user login). The project's `create` and `check` APIs are shared, so include a parameter when you create the AuthSession that identifies which flow it represents, branch on it inside `create`, and read it back inside `check` with [`getAuthSessionParameters`](/main/05-references/runtime-sdk-typescript/get-auth-session-parameters) to validate the correct post-login state.
## AuthSession types
The setup above uses **credentials-based** AuthSessions, which is the most common type. Intuned stores your credentials securely and uses them for automatic recreation when sessions expire.
Two other types are available for specific situations:
| Type | Who authenticates | Auto-recreation | When to use |
| --------------------- | ----------------- | --------------- | ---------------------------------------- |
| **Credentials-based** | Code | ✓ | Standard login flows (default) |
| **Runtime-based** | Code | ✓ | Changing credentials (OTPs, temp tokens) |
| **Recorder-based** | Human | ✗ | Complex login (MFA, CAPTCHA, biometrics) |
### Runtime-based AuthSessions
Pass credentials with each Run instead of storing them. Use this when credentials change frequently (like OTPs) or can't be stored.
```typescript trigger-intuned-run-with-runtime-auth-session.ts theme={null}
import { IntunedClient } from "@intuned/client";
const intunedClient = new IntunedClient({
workspaceId: "123e4567-e89b-12d3-a456-426614174000",
apiKey: process.env["INTUNED_API_KEY"] ?? "",
});
async function run() {
const result = await intunedClient.projects.runs.start("my-project", {
parameters: {
"param1": "value1",
"param2": 42,
"param3": true,
},
api: "my-awesome-api",
authSession: {
id: "auth-session-123", // Optional-omit to create new each time
runtimeInput: {
username: "user@example.com",
otp: "123456",
},
},
});
console.log(result);
}
run();
```
```python trigger-intuned-run-with-runtime-auth-session.py theme={null}
from intuned_client import IntunedClient
from intuned_client import models
import os
with IntunedClient(
workspace_id="123e4567-e89b-12d3-a456-426614174000",
api_key=os.getenv("INTUNED_API_KEY", ""),
) as ic_client:
res = ic_client.projects.runs.start(
project_name="my-project",
body=models.RunStartRequestBody(
parameters={
"param1": "value1",
"param2": 42,
"param3": True,
},
api="my-awesome-api",
auth_session={
"id": "auth-session-123", # Optional—omit to create new each time
"runtime_input": {
"username": "user@example.com",
"otp": "123456",
},
},
),
)
# Handle response
print(res)
```
```bash trigger-intuned-run-with-runtime-auth-session.sh theme={null}
#!/bin/bash
curl --request POST \
--url https://app.intuned.io/api/v1/workspace/{workspaceId}/projects/{projectName}/run/start \
--header 'Content-Type: application/json' \
--header 'x-api-key: ' \
--data '
{
"api": "my-awesome-api",
"parameters": {
"param1": "value1",
"param2": 42,
"param3": true
},
"saveTrace": true,
"requestTimeout": 600,
"authSession": {
"id": "auth-session-123",
"runtimeInput": {
"username": "user@example.com",
"otp": "123456"
}
}
}
'
```
### Recorder-based AuthSessions
Recorder-based AuthSessions let a human log in through a hosted browser. Intuned captures the authenticated state after login completes. Use this for login flows that require human interaction (MFA apps, biometrics, complex CAPTCHAs).
To enable recorder-based AuthSessions, contact support via Slack or
[email](mailto:support@intunedhq.com).
## Configuration options
### Validation and recreation settings
Control how Intuned handles validation and recreation per Run.
```typescript trigger-intuned-run-with-validation-settings.ts theme={null}
import { IntunedClient } from "@intuned/client";
const intunedClient = new IntunedClient({
workspaceId: "123e4567-e89b-12d3-a456-426614174000",
apiKey: process.env["INTUNED_API_KEY"] ?? "",
});
async function run() {
const result = await intunedClient.projects.runs.start("my-project", {
parameters: {
"param1": "value1",
"param2": 42,
"param3": true,
},
api: "my-awesome-api",
authSession: {
id: "auth-session-123",
autoRecreate: true, // Recreate if validation fails (default: true)
checkAttempts: 3, // Retry validation this many times
createAttempts: 3, // Retry recreation this many times
},
});
console.log(result);
}
run();
```
```python trigger-intuned-run-with-validation-settings.py theme={null}
from intuned_client import IntunedClient
from intuned_client import models
import os
with IntunedClient(
workspace_id="123e4567-e89b-12d3-a456-426614174000",
api_key=os.getenv("INTUNED_API_KEY", ""),
) as ic_client:
res = ic_client.projects.runs.start(
project_name="my-project",
body=models.RunStartRequestBody(
parameters={
"param1": "value1",
"param2": 42,
"param3": True,
},
api="my-awesome-api",
auth_session={
"id": "auth-session-123",
"auto_recreate": True, # Recreate if validation fails (default: true)
"check_attempts": 3, # Retry validation this many times
"create_attempts": 3, # Retry recreation this many times
},
),
)
# Handle response
print(res)
```
```bash trigger-intuned-run-with-validation-settings.sh theme={null}
#!/bin/bash
curl --request POST \
--url https://app.intuned.io/api/v1/workspace/{workspaceId}/projects/{projectName}/run/start \
--header 'Content-Type: application/json' \
--header 'x-api-key: ' \
--data '
{
"api": "my-awesome-api",
"parameters": {
"param1": "value1",
"param2": 42,
"param3": true
},
"saveTrace": true,
"requestTimeout": 600,
"authSession": {
"id": "auth-session-123",
"autoRecreate": true,
"checkAttempts": 3,
"createAttempts": 3
}
}
'
```
| Option | Default | Description |
| ---------------- | ------- | ------------------------------------------------------------------- |
| `autoRecreate` | `true` | If validation fails, run `create` to get a new session |
| `checkAttempts` | 1 | Times to retry the `check` API before considering validation failed |
| `createAttempts` | 1 | Times to retry the `create` API if recreation triggers |
### Updating credentials
Update stored credentials for a credentials-based AuthSession:
```typescript trigger-intuned-auth-session-update.ts theme={null}
import { IntunedClient } from "@intuned/client";
const intunedClient = new IntunedClient({
workspaceId: "123e4567-e89b-12d3-a456-426614174000",
apiKey: process.env["INTUNED_API_KEY"] ?? "",
});
async function run() {
const result = await intunedClient.projects.authSessions.update.start("my-project", "", {
parameters: {
"username": "john.doe",
"password": "newPassword",
},
proxy: "http://proxy.example.com:8080",
});
console.log(result);
}
run();
```
```python trigger-intuned-auth-session-update.py theme={null}
from intuned_client import IntunedClient
from intuned_client import models
import os
with IntunedClient(
workspace_id="123e4567-e89b-12d3-a456-426614174000",
api_key=os.getenv("INTUNED_API_KEY", ""),
) as ic_client:
res = ic_client.projects.auth_sessions.update.start(
project_name="my-project",
auth_session_id="",
body=models.AuthSessionsUpdateStartRequestBody(
parameters={
"username": "john.doe",
"password": "newPassword",
},
proxy="http://proxy.example.com:8080",
),
)
# Handle response
print(res)
```
```bash trigger-intuned-auth-session-update.sh theme={null}
#!/bin/bash
curl --request POST \
--url https://app.intuned.io/api/v1/workspace/{workspaceId}/projects/{projectName}/auth-sessions/{authSessionId}/update \
--header 'Content-Type: application/json' \
--header 'x-api-key: ' \
--data '
{
"parameters": {
"username": "john.doe",
"password": "newPassword"
},
"proxy": "http://proxy.example.com:8080",
"createAttempts": 3,
"checkAttempts": 3,
"saveTrace": true
}
'
```
Run from your project directory (where Intuned Settings is located), or specify the project explicitly with `-p `.
```bash theme={null}
intuned platform authsessions update \
--input '{"username": "john.doe", "password": "newPassword"}' \
--wait
```
With a proxy:
```bash theme={null}
intuned platform authsessions update my-auth-session \
--input '{"username": "john.doe", "password": "newPassword"}' \
--proxy "http://proxy.example.com:8080" \
--wait
```
See [Auth Sessions Update](/main/05-references/cli/platform#auth-sessions-update) for all options.
### Proxy support
Configure a proxy when creating an AuthSession. All Runs using that AuthSession—including validation and recreation—route through the proxy.
```typescript create-intuned-auth-session-with-proxy.ts theme={null}
import { IntunedClient } from "@intuned/client";
const intunedClient = new IntunedClient({
workspaceId: "123e4567-e89b-12d3-a456-426614174000",
apiKey: process.env["INTUNED_API_KEY"] ?? "",
});
async function run() {
const result = await intunedClient.projects.authSessions.create.start("my-project", {
parameters: {
"username": "john.doe",
"password": "password",
},
proxy: "http://proxy.example.com:8080",
});
console.log(result);
}
run();
```
```python create-intuned-auth-session-with-proxy.py theme={null}
from intuned_client import IntunedClient
from intuned_client import models
import os
with IntunedClient(
workspace_id="123e4567-e89b-12d3-a456-426614174000",
api_key=os.getenv("INTUNED_API_KEY", ""),
) as ic_client:
res = ic_client.projects.auth_sessions.create.start(
project_name="my-project",
body=models.AuthSessionsCreateStartRequestBody(
parameters={
"username": "john.doe",
"password": "password",
},
id="auth-session-123",
proxy="http://proxy.example.com:8080",
),
)
# Handle response
print(res)
```
```bash create-intuned-auth-session-with-proxy.sh theme={null}
#!/bin/bash
curl --request POST \
--url https://app.intuned.io/api/v1/workspace/{workspaceId}/projects/{projectName}/auth-sessions/create \
--header 'Content-Type: application/json' \
--header 'x-api-key: ' \
--data '
{
"id": "auth-session-123",
"parameters": {
"username": "john.doe",
"password": "password"
},
"proxy": "http://proxy.example.com:8080"
}
'
```
## Using AuthSessions in Jobs
Specify the AuthSession in the Job configuration. All Runs in the JobRun use the same AuthSession.
```typescript create-intuned-job-with-auth-session.ts theme={null}
import { IntunedClient } from "@intuned/client";
const intunedClient = new IntunedClient({
workspaceId: "123e4567-e89b-12d3-a456-426614174000",
apiKey: process.env["INTUNED_API_KEY"] ?? "",
});
async function run() {
const result = await intunedClient.projects.jobs.create("my-project", {
id: "my-awesome-job",
payload: [
{
parameters: {
"param1": "value1",
"param2": 42,
"param3": true,
},
apiName: "my-awesome-api",
},
],
configuration: {
retry: {
"maximumAttempts": 3,
},
},
auth_session: {
id: "auth-session-123",
},
});
console.log(result);
}
run();
```
```python create-intuned-job-with-auth-session.py theme={null}
from intuned_client import IntunedClient
from intuned_client import models
import os
with IntunedClient(
workspace_id="123e4567-e89b-12d3-a456-426614174000",
api_key=os.getenv("INTUNED_API_KEY", ""),
) as ic_client:
res = ic_client.projects.jobs.create(
project_name="my-project",
body=models.JobsCreateRequestBody(
id="my-awesome-job",
payload=[
{
"parameters": {
"param1": "value1",
"param2": 42,
"param3": True,
},
"api_name": "my-awesome-api",
},
],
configuration={
"retry": {
"maximum_attempts": 3,
},
},
auth_session={
"id": "",
},
),
)
# Handle response
print(res)
```
```bash create-intuned-job-with-auth-session.sh theme={null}
#!/bin/bash
curl --request POST \
--url https://app.intuned.io/api/v1/workspace/{workspaceId}/projects/{projectName}/jobs \
--header 'Content-Type: application/json' \
--header 'x-api-key: ' \
--data '
{
"id": "my-awesome-job",
"configuration": {
"retry": {
"maximumAttempts": 3
}
},
"payload": [
{
"apiName": "my-awesome-api",
"parameters": {
"param1": "value1",
"param2": 42,
"param3": true
}
}
],
"auth_session": {
"id": "auth-session-123"
}
}
'
```
Jobs validate the AuthSession when the JobRun starts and before each Run attempt. If validation fails during execution and can't recover, the JobRun pauses—you can fix the AuthSession manually and resume it from where it paused.
## Best practices
* **Make check fast and reliable.** Target lightweight endpoints or specific DOM elements. Check for authenticated content, not just absence of login forms.
* **Use single-account pattern for internal tools.** Fewer AuthSessions to manage and simpler credential rotation.
* **Separate AuthSessions per user.** For multi-user integrations, never share AuthSessions across users.
* **Set appropriate retry attempts.** Increase `checkAttempts` for flaky networks; increase `createAttempts` if login sometimes fails transiently.
* **Enable CAPTCHA solving if needed.** Configure in `Intuned.json` if your target system uses CAPTCHAs during login.
## Limitations
* AuthSession type can't change after creation—create a new one to switch types.
* Recorder-based AuthSessions can't auto-recreate; they need human intervention when expired.
* Validation adds latency since check runs before every attempt—keep your check API fast.
* AuthSessions are project-scoped; you can't use one from another project.
## FAQs
AuthSessions persist indefinitely in Intuned, but the underlying session with the target system depends on that system's policies. Some expire after hours, others after weeks. With auto-recreation enabled, AuthSessions effectively last as long as your credentials remain valid.
{" "}
For credentials-based AuthSessions, use the update API to provide new
credentials. For runtime-based, pass the new credentials in your next Run. For
recorder-based, have a human log in again through the recorder.
{" "}
Your check API may not accurately detect authenticated state. Common issues:
checking before the page fully loads, checking for elements that appear on
both authenticated and unauthenticated pages, or not handling redirects
properly. Review your check API to ensure it waits for page load and checks
for content that *only* appears when authenticated.
Frequent recreation may indicate incorrect check logic or sessions expiring faster than expected. Verify your check API isn't too strict (failing on transient issues), and investigate the target system's session duration. Consider increasing `checkAttempts` to handle transient failures.
Yes. A project has one `create` and one `check` API, so when a site exposes more than one login flow (for example, separate provider and patient logins on a healthcare portal), pass a parameter when you create each AuthSession that identifies the flow, branch on it inside `create`, and read it back inside `check` with [`getAuthSessionParameters`](/main/05-references/runtime-sdk-typescript/get-auth-session-parameters) so each AuthSession is validated against the correct post-login state. See the [multiple login flows on the same site](#usage-patterns) usage pattern.
## Related resources
Complete API documentation for AuthSession operations
Detailed explanation of how AuthSessions integrate with Intuned's execution
model
Use AuthSessions with scheduled and batched workflows
Configure CAPTCHA solving and proxies for authentication
Run from your project directory (where Intuned Settings is located), or specify the project explicitly with `-p `.
```bash theme={null}
intuned platform authsessions create \
--input '{"username": "john.doe", "password": "password"}' \
--wait
```
Use `--proxy` to route traffic through a proxy:
```bash theme={null}
intuned platform authsessions create my-auth-session \
--input '{"username": "john.doe", "password": "password"}' \
--proxy "http://proxy.example.com:8080" \
--wait
```
The `--wait` flag waits for the auth session creation to complete (defaults to 10 minutes). The `--input` accepts a JSON string or a path to a JSON file prefixed with `@`:
```bash theme={null}
intuned platform authsessions create my-auth-session --input @credentials.json --wait
```
See [Auth Sessions Create](/main/05-references/cli/platform#auth-sessions-create) for all options.
Define AuthSession instances in `intuned-resources/auth-sessions/` and deploy them with your project. This is separate from the `auth-sessions/` directory, which still contains your `create` and `check` automation logic.
```jsonc intuned-resources/auth-sessions/test-auth-session.auth-session.jsonc theme={null}
{
"parameters": {
"username": "demo@email.com",
"password": "DemoUser2024!"
}
}
```
* `test-auth-session.auth-session.jsonc` creates an AuthSession with ID `test-auth-session`.
* `.json` and `.jsonc` are both supported.
* After deployment, the AuthSession appears in the **AuthSessions** tab with **Source** shown as `Created via code`.
* New and updated code-defined AuthSessions automatically trigger a create run, so they may appear as pending until they become ready.
* Update the file and redeploy to change the AuthSession.
* Remove the file and redeploy to delete the AuthSession. If it is currently used by an active Run or JobRun, deletion is skipped until it is no longer in use.
* Code-defined AuthSessions are read-only in the dashboard and API. Edit the file instead.
### 5. Use the AuthSession in your Runs
When starting a Run, specify the AuthSession to use. Here's an example of starting a Run with an existing AuthSession:
```typescript trigger-intuned-run-with-auth-session.ts theme={null}
import { IntunedClient } from "@intuned/client";
const intunedClient = new IntunedClient({
workspaceId: "123e4567-e89b-12d3-a456-426614174000",
apiKey: process.env["INTUNED_API_KEY"] ?? "",
});
async function run() {
const result = await intunedClient.projects.runs.start("my-project", {
parameters: {
"param1": "value1",
"param2": 42,
"param3": true,
},
api: "my-awesome-api",
authSession: {
id: "auth-session-123",
},
});
console.log(result);
}
run();
```
```python trigger-intuned-run-with-auth-session.py theme={null}
from intuned_client import IntunedClient
from intuned_client import models
import os
with IntunedClient(
workspace_id="123e4567-e89b-12d3-a456-426614174000",
api_key=os.getenv("INTUNED_API_KEY", ""),
) as ic_client:
res = ic_client.projects.runs.start(
project_name="my-project",
body=models.RunStartRequestBody(
parameters={
"param1": "value1",
"param2": 42,
"param3": True,
},
api="my-awesome-api",
auth_session={
"id": "auth-session-123"
},
),
)
# Handle response
print(res)
```
```bash trigger-intuned-run-with-auth-session.sh theme={null}
#!/bin/bash
curl --request POST \
--url https://app.intuned.io/api/v1/workspace/{workspaceId}/projects/{projectName}/run/start \
--header 'Content-Type: application/json' \
--header 'x-api-key: ' \
--data '
{
"api": "my-awesome-api",
"parameters": {
"param1": "value1",
"param2": 42,
"param3": true
},
"saveTrace": true,
"requestTimeout": 600,
"authSession": {
"id": "auth-session-123"
}
}
'
```
```bash intuned-cli theme={null}
intuned platform runs start '{
"api": "my-awesome-api",
"parameters": {
"param1": "value1",
"param2": 42,
"param3": true
},
"authSession": {
"id": "auth-session-123"
}
}'
```
Check the [Runs API Playground](/client-apis/api-reference/projectsruns/run-api--start) for more details on starting Runs via API.
That's it—Intuned validates the session before running your API and recreates it automatically if it's expired.
## How AuthSessions work
When you run an API in an AuthSession-enabled project:
1. **Validation**: Before your code runs, Intuned checks if the AuthSession is still authenticated by running your `check` API.
2. **Auto-recreation**: If validation fails and auto-recreation is enabled (the default), Intuned runs your `create` API to log in again, then re-validates.
3. **Execution**: Only after validation succeeds does your API code run.
This happens for every Run attempt, so your automation never runs with invalid credentials.
### AuthSession Runs in your project
AuthSession operations appear as special Run types in your Runs list:
| Run type | When it triggers | What it does |
| ---------------------- | --------------------------------------------------- | --------------------------------------------------------------------------------------- |
| `AuthSession:Validate` | Before each API Run attempt | Runs `check` API; if it fails and auto-recreate is on, runs `create` then `check` again |
| `AuthSession:Create` | When you create an AuthSession via dashboard or API | Runs `create` API, then `check` to confirm success |
| `AuthSession:Update` | When you update an AuthSession's credentials | Runs `create` with new credentials, then `check` to confirm |
If an `AuthSession:Validate` fails, the dependent API Run is canceled (not marked as failed).
For a detailed look at how AuthSessions integrate into Intuned's execution
model, see [Intuned in depth →
AuthSessions](/main/01-learn/deep-dives/intuned-indepth#authsessions).
## Usage patterns
AuthSessions support three common patterns:
**Single account automation:** One account performs multiple operations. Create a single AuthSession and use it to start all Runs. Good for internal tools where you scrape analytics, export reports, and update settings—each as a separate API, all sharing one AuthSession.
**Multi-account automation:** Each user has their own AuthSession. Your app creates an AuthSession when a user "connects" their account, then runs automations on their behalf. Good for tools like social media managers where each user connects their own account.
**Multiple login flows on the same site:** A single site exposes more than one login flow (for example, a healthcare portal with separate provider and patient logins, or an admin login alongside an end-user login). The project's `create` and `check` APIs are shared, so include a parameter when you create the AuthSession that identifies which flow it represents, branch on it inside `create`, and read it back inside `check` with [`getAuthSessionParameters`](/main/05-references/runtime-sdk-typescript/get-auth-session-parameters) to validate the correct post-login state.
## AuthSession types
The setup above uses **credentials-based** AuthSessions, which is the most common type. Intuned stores your credentials securely and uses them for automatic recreation when sessions expire.
Two other types are available for specific situations:
| Type | Who authenticates | Auto-recreation | When to use |
| --------------------- | ----------------- | --------------- | ---------------------------------------- |
| **Credentials-based** | Code | ✓ | Standard login flows (default) |
| **Runtime-based** | Code | ✓ | Changing credentials (OTPs, temp tokens) |
| **Recorder-based** | Human | ✗ | Complex login (MFA, CAPTCHA, biometrics) |
### Runtime-based AuthSessions
Pass credentials with each Run instead of storing them. Use this when credentials change frequently (like OTPs) or can't be stored.
```typescript trigger-intuned-run-with-runtime-auth-session.ts theme={null}
import { IntunedClient } from "@intuned/client";
const intunedClient = new IntunedClient({
workspaceId: "123e4567-e89b-12d3-a456-426614174000",
apiKey: process.env["INTUNED_API_KEY"] ?? "",
});
async function run() {
const result = await intunedClient.projects.runs.start("my-project", {
parameters: {
"param1": "value1",
"param2": 42,
"param3": true,
},
api: "my-awesome-api",
authSession: {
id: "auth-session-123", // Optional-omit to create new each time
runtimeInput: {
username: "user@example.com",
otp: "123456",
},
},
});
console.log(result);
}
run();
```
```python trigger-intuned-run-with-runtime-auth-session.py theme={null}
from intuned_client import IntunedClient
from intuned_client import models
import os
with IntunedClient(
workspace_id="123e4567-e89b-12d3-a456-426614174000",
api_key=os.getenv("INTUNED_API_KEY", ""),
) as ic_client:
res = ic_client.projects.runs.start(
project_name="my-project",
body=models.RunStartRequestBody(
parameters={
"param1": "value1",
"param2": 42,
"param3": True,
},
api="my-awesome-api",
auth_session={
"id": "auth-session-123", # Optional—omit to create new each time
"runtime_input": {
"username": "user@example.com",
"otp": "123456",
},
},
),
)
# Handle response
print(res)
```
```bash trigger-intuned-run-with-runtime-auth-session.sh theme={null}
#!/bin/bash
curl --request POST \
--url https://app.intuned.io/api/v1/workspace/{workspaceId}/projects/{projectName}/run/start \
--header 'Content-Type: application/json' \
--header 'x-api-key: ' \
--data '
{
"api": "my-awesome-api",
"parameters": {
"param1": "value1",
"param2": 42,
"param3": true
},
"saveTrace": true,
"requestTimeout": 600,
"authSession": {
"id": "auth-session-123",
"runtimeInput": {
"username": "user@example.com",
"otp": "123456"
}
}
}
'
```
### Recorder-based AuthSessions
Recorder-based AuthSessions let a human log in through a hosted browser. Intuned captures the authenticated state after login completes. Use this for login flows that require human interaction (MFA apps, biometrics, complex CAPTCHAs).
To enable recorder-based AuthSessions, contact support via Slack or
[email](mailto:support@intunedhq.com).
## Configuration options
### Validation and recreation settings
Control how Intuned handles validation and recreation per Run.
```typescript trigger-intuned-run-with-validation-settings.ts theme={null}
import { IntunedClient } from "@intuned/client";
const intunedClient = new IntunedClient({
workspaceId: "123e4567-e89b-12d3-a456-426614174000",
apiKey: process.env["INTUNED_API_KEY"] ?? "",
});
async function run() {
const result = await intunedClient.projects.runs.start("my-project", {
parameters: {
"param1": "value1",
"param2": 42,
"param3": true,
},
api: "my-awesome-api",
authSession: {
id: "auth-session-123",
autoRecreate: true, // Recreate if validation fails (default: true)
checkAttempts: 3, // Retry validation this many times
createAttempts: 3, // Retry recreation this many times
},
});
console.log(result);
}
run();
```
```python trigger-intuned-run-with-validation-settings.py theme={null}
from intuned_client import IntunedClient
from intuned_client import models
import os
with IntunedClient(
workspace_id="123e4567-e89b-12d3-a456-426614174000",
api_key=os.getenv("INTUNED_API_KEY", ""),
) as ic_client:
res = ic_client.projects.runs.start(
project_name="my-project",
body=models.RunStartRequestBody(
parameters={
"param1": "value1",
"param2": 42,
"param3": True,
},
api="my-awesome-api",
auth_session={
"id": "auth-session-123",
"auto_recreate": True, # Recreate if validation fails (default: true)
"check_attempts": 3, # Retry validation this many times
"create_attempts": 3, # Retry recreation this many times
},
),
)
# Handle response
print(res)
```
```bash trigger-intuned-run-with-validation-settings.sh theme={null}
#!/bin/bash
curl --request POST \
--url https://app.intuned.io/api/v1/workspace/{workspaceId}/projects/{projectName}/run/start \
--header 'Content-Type: application/json' \
--header 'x-api-key: ' \
--data '
{
"api": "my-awesome-api",
"parameters": {
"param1": "value1",
"param2": 42,
"param3": true
},
"saveTrace": true,
"requestTimeout": 600,
"authSession": {
"id": "auth-session-123",
"autoRecreate": true,
"checkAttempts": 3,
"createAttempts": 3
}
}
'
```
| Option | Default | Description |
| ---------------- | ------- | ------------------------------------------------------------------- |
| `autoRecreate` | `true` | If validation fails, run `create` to get a new session |
| `checkAttempts` | 1 | Times to retry the `check` API before considering validation failed |
| `createAttempts` | 1 | Times to retry the `create` API if recreation triggers |
### Updating credentials
Update stored credentials for a credentials-based AuthSession:
```typescript trigger-intuned-auth-session-update.ts theme={null}
import { IntunedClient } from "@intuned/client";
const intunedClient = new IntunedClient({
workspaceId: "123e4567-e89b-12d3-a456-426614174000",
apiKey: process.env["INTUNED_API_KEY"] ?? "",
});
async function run() {
const result = await intunedClient.projects.authSessions.update.start("my-project", "", {
parameters: {
"username": "john.doe",
"password": "newPassword",
},
proxy: "http://proxy.example.com:8080",
});
console.log(result);
}
run();
```
```python trigger-intuned-auth-session-update.py theme={null}
from intuned_client import IntunedClient
from intuned_client import models
import os
with IntunedClient(
workspace_id="123e4567-e89b-12d3-a456-426614174000",
api_key=os.getenv("INTUNED_API_KEY", ""),
) as ic_client:
res = ic_client.projects.auth_sessions.update.start(
project_name="my-project",
auth_session_id="",
body=models.AuthSessionsUpdateStartRequestBody(
parameters={
"username": "john.doe",
"password": "newPassword",
},
proxy="http://proxy.example.com:8080",
),
)
# Handle response
print(res)
```
```bash trigger-intuned-auth-session-update.sh theme={null}
#!/bin/bash
curl --request POST \
--url https://app.intuned.io/api/v1/workspace/{workspaceId}/projects/{projectName}/auth-sessions/{authSessionId}/update \
--header 'Content-Type: application/json' \
--header 'x-api-key: ' \
--data '
{
"parameters": {
"username": "john.doe",
"password": "newPassword"
},
"proxy": "http://proxy.example.com:8080",
"createAttempts": 3,
"checkAttempts": 3,
"saveTrace": true
}
'
```
Run from your project directory (where Intuned Settings is located), or specify the project explicitly with `-p `.
```bash theme={null}
intuned platform authsessions update \
--input '{"username": "john.doe", "password": "newPassword"}' \
--wait
```
With a proxy:
```bash theme={null}
intuned platform authsessions update my-auth-session \
--input '{"username": "john.doe", "password": "newPassword"}' \
--proxy "http://proxy.example.com:8080" \
--wait
```
See [Auth Sessions Update](/main/05-references/cli/platform#auth-sessions-update) for all options.
### Proxy support
Configure a proxy when creating an AuthSession. All Runs using that AuthSession—including validation and recreation—route through the proxy.
```typescript create-intuned-auth-session-with-proxy.ts theme={null}
import { IntunedClient } from "@intuned/client";
const intunedClient = new IntunedClient({
workspaceId: "123e4567-e89b-12d3-a456-426614174000",
apiKey: process.env["INTUNED_API_KEY"] ?? "",
});
async function run() {
const result = await intunedClient.projects.authSessions.create.start("my-project", {
parameters: {
"username": "john.doe",
"password": "password",
},
proxy: "http://proxy.example.com:8080",
});
console.log(result);
}
run();
```
```python create-intuned-auth-session-with-proxy.py theme={null}
from intuned_client import IntunedClient
from intuned_client import models
import os
with IntunedClient(
workspace_id="123e4567-e89b-12d3-a456-426614174000",
api_key=os.getenv("INTUNED_API_KEY", ""),
) as ic_client:
res = ic_client.projects.auth_sessions.create.start(
project_name="my-project",
body=models.AuthSessionsCreateStartRequestBody(
parameters={
"username": "john.doe",
"password": "password",
},
id="auth-session-123",
proxy="http://proxy.example.com:8080",
),
)
# Handle response
print(res)
```
```bash create-intuned-auth-session-with-proxy.sh theme={null}
#!/bin/bash
curl --request POST \
--url https://app.intuned.io/api/v1/workspace/{workspaceId}/projects/{projectName}/auth-sessions/create \
--header 'Content-Type: application/json' \
--header 'x-api-key: ' \
--data '
{
"id": "auth-session-123",
"parameters": {
"username": "john.doe",
"password": "password"
},
"proxy": "http://proxy.example.com:8080"
}
'
```
## Using AuthSessions in Jobs
Specify the AuthSession in the Job configuration. All Runs in the JobRun use the same AuthSession.
```typescript create-intuned-job-with-auth-session.ts theme={null}
import { IntunedClient } from "@intuned/client";
const intunedClient = new IntunedClient({
workspaceId: "123e4567-e89b-12d3-a456-426614174000",
apiKey: process.env["INTUNED_API_KEY"] ?? "",
});
async function run() {
const result = await intunedClient.projects.jobs.create("my-project", {
id: "my-awesome-job",
payload: [
{
parameters: {
"param1": "value1",
"param2": 42,
"param3": true,
},
apiName: "my-awesome-api",
},
],
configuration: {
retry: {
"maximumAttempts": 3,
},
},
auth_session: {
id: "auth-session-123",
},
});
console.log(result);
}
run();
```
```python create-intuned-job-with-auth-session.py theme={null}
from intuned_client import IntunedClient
from intuned_client import models
import os
with IntunedClient(
workspace_id="123e4567-e89b-12d3-a456-426614174000",
api_key=os.getenv("INTUNED_API_KEY", ""),
) as ic_client:
res = ic_client.projects.jobs.create(
project_name="my-project",
body=models.JobsCreateRequestBody(
id="my-awesome-job",
payload=[
{
"parameters": {
"param1": "value1",
"param2": 42,
"param3": True,
},
"api_name": "my-awesome-api",
},
],
configuration={
"retry": {
"maximum_attempts": 3,
},
},
auth_session={
"id": "",
},
),
)
# Handle response
print(res)
```
```bash create-intuned-job-with-auth-session.sh theme={null}
#!/bin/bash
curl --request POST \
--url https://app.intuned.io/api/v1/workspace/{workspaceId}/projects/{projectName}/jobs \
--header 'Content-Type: application/json' \
--header 'x-api-key: ' \
--data '
{
"id": "my-awesome-job",
"configuration": {
"retry": {
"maximumAttempts": 3
}
},
"payload": [
{
"apiName": "my-awesome-api",
"parameters": {
"param1": "value1",
"param2": 42,
"param3": true
}
}
],
"auth_session": {
"id": "auth-session-123"
}
}
'
```
Jobs validate the AuthSession when the JobRun starts and before each Run attempt. If validation fails during execution and can't recover, the JobRun pauses—you can fix the AuthSession manually and resume it from where it paused.
## Best practices
* **Make check fast and reliable.** Target lightweight endpoints or specific DOM elements. Check for authenticated content, not just absence of login forms.
* **Use single-account pattern for internal tools.** Fewer AuthSessions to manage and simpler credential rotation.
* **Separate AuthSessions per user.** For multi-user integrations, never share AuthSessions across users.
* **Set appropriate retry attempts.** Increase `checkAttempts` for flaky networks; increase `createAttempts` if login sometimes fails transiently.
* **Enable CAPTCHA solving if needed.** Configure in `Intuned.json` if your target system uses CAPTCHAs during login.
## Limitations
* AuthSession type can't change after creation—create a new one to switch types.
* Recorder-based AuthSessions can't auto-recreate; they need human intervention when expired.
* Validation adds latency since check runs before every attempt—keep your check API fast.
* AuthSessions are project-scoped; you can't use one from another project.
## FAQs
AuthSessions persist indefinitely in Intuned, but the underlying session with the target system depends on that system's policies. Some expire after hours, others after weeks. With auto-recreation enabled, AuthSessions effectively last as long as your credentials remain valid.
{" "}
For credentials-based AuthSessions, use the update API to provide new
credentials. For runtime-based, pass the new credentials in your next Run. For
recorder-based, have a human log in again through the recorder.
{" "}
Your check API may not accurately detect authenticated state. Common issues:
checking before the page fully loads, checking for elements that appear on
both authenticated and unauthenticated pages, or not handling redirects
properly. Review your check API to ensure it waits for page load and checks
for content that *only* appears when authenticated.
Frequent recreation may indicate incorrect check logic or sessions expiring faster than expected. Verify your check API isn't too strict (failing on transient issues), and investigate the target system's session duration. Consider increasing `checkAttempts` to handle transient failures.
Yes. A project has one `create` and one `check` API, so when a site exposes more than one login flow (for example, separate provider and patient logins on a healthcare portal), pass a parameter when you create each AuthSession that identifies the flow, branch on it inside `create`, and read it back inside `check` with [`getAuthSessionParameters`](/main/05-references/runtime-sdk-typescript/get-auth-session-parameters) so each AuthSession is validated against the correct post-login state. See the [multiple login flows on the same site](#usage-patterns) usage pattern.
## Related resources
Complete API documentation for AuthSession operations
Detailed explanation of how AuthSessions integrate with Intuned's execution
model
Use AuthSessions with scheduled and batched workflows
Configure CAPTCHA solving and proxies for authentication