> ## Documentation Index
> Fetch the complete documentation index at: https://intunedhq.com/docs/llms.txt
> Use this file to discover all available pages before exploring further.
# S3 Job Sink
## Overview
By the end of this guide, you'll have an Intuned project (+ scraping Job with S3 sink) that sends scraped data directly to AWS S3. You'll:
1. Create an S3 bucket and configure AWS credentials for Intuned.
2. Configure a Job with an S3 sink.
3. Trigger a Job and verify data lands in S3.
## Prerequisites
Before you begin, ensure you have the following:
* An AWS account with S3 access.
* An Intuned account.
This guide assumes you have a basic understanding of Intuned Projects and Jobs. If you're new to Intuned, start with the [getting started guide](/main/00-getting-started/introduction).
## When to use S3 integration
Scrapers built on Intuned typically run via Jobs on a schedule. When a JobRun completes, you want that data sent somewhere for processing or persistence.
S3 integration automatically delivers scraped data to your S3 bucket as JSON files. From there, you can process results using AWS tools like Lambda—or connect to other services.
While this guide focuses on scraping, S3 integration works for any Intuned Job—the files sent to S3 are Run results from any automation.
## Guide
### 1. Create an S3 bucket and access credentials
Create an S3 bucket and IAM credentials that Intuned can use to write data:
1. Log in to the [AWS Management Console](https://console.aws.amazon.com/)
2. Navigate to the S3 service
3. Select **Create bucket**
4. Enter a unique bucket name (e.g., `my-intuned-data`)
Choose a descriptive bucket name that makes it easy to identify its purpose (e.g., `company-intuned-production`).
When creating your bucket:
1. **Object Ownership**: Set to "Access Control Lists (ACLs) disabled"
2. **Block Public Access**: Keep all public access blocked (recommended for security)
3. **Bucket Versioning**: Optional - enable if you want to keep historical versions of files
4. **Encryption**: Optional - enable default encryption for data at rest
5. Select **Create bucket** to finish
Intuned only needs write access to your bucket, so keeping public access blocked is safe and recommended.
Create a dedicated IAM user with limited permissions for Intuned:
1. Navigate to **IAM** in the AWS Console
2. Select **Users** in the left sidebar, then **Create user**
3. Enter a username (e.g., `intuned-s3-writer`)
4. Select **Next**, which takes you to the permissions page
On the permissions page:
1. Select **Attach existing policies directly**
2. Select **Create policy** (opens in new tab)
3. Select the **JSON** tab and paste this policy:
```json theme={null}
{
"Version": "2012-10-17",
"Statement": [
{
"Effect": "Allow",
"Action": [
"s3:PutObject"
],
"Resource": "arn:aws:s3:::YOUR-BUCKET-NAME/*"
}
]
}
```
4. Replace `YOUR-BUCKET-NAME` with your actual bucket name
5. Select **Next**, which takes you to the Review page
6. Name the policy `IntunedS3WritePolicy`
7. Select **Create policy**
Replace `YOUR-BUCKET-NAME` in the policy with your actual bucket name. Don't use root account credentials - always create a dedicated IAM user.
Back in the user creation flow:
1. Refresh the policies list
2. Search for `IntunedS3WritePolicy`
3. Select the checkbox next to the policy
4. Select **Next** to go to the Review page
5. Select **Create user**
Then open the newly created user page:
1. Go to the **Security credentials** tab
2. Select **Create access key**
3. Choose **Application running outside AWS** and select **Next**
4. Select **Create access key**
5. **Copy the Access key ID** - you'll need this for Intuned
6. **Copy the Secret access key** - you'll need this for Intuned (only shown once)
7. Download the CSV or save these credentials securely
Store your credentials securely. The secret access key is only shown once and cannot be retrieved later. Never commit credentials to version control.
You now have everything needed to configure S3 in Intuned. Save these details:
* **Bucket name**: Your S3 bucket name
* **Region**: Your AWS region (e.g., `us-west-2`)
* **Access key ID**: From the IAM user
* **Secret access key**: From the IAM user
You'll use these in the next section to configure your Intuned Job.
### 2. Configure a Job with an S3 sink
Now that your S3 bucket is ready, add an S3 sink to a Job so Run results are delivered to your bucket.
You can use an existing project or create a new one.
For this example, we'll use the `ecommerce-scraper-quickstart` project that you can deploy using the [Deploy your first scraper](/main/00-getting-started/quickstarts/scraper) quickstart tutorial.
1. Go to [app.intuned.io](https://app.intuned.io)
2. Open your `ecommerce-scraper-quickstart` project
3. Select the **Jobs** tab
4. Select **Create Job**
5. Fill in the Job details:
* **Job ID**: `default-with-s3`
* **Payload API**: `list`
* **Payload Parameters**: `{}`
6. Enable sink configuration and add your S3 details:
* **Type**: `s3`
* **Bucket**: Your S3 bucket name (e.g., `my-intuned-scraper-data`)
* **Region**: Your AWS region (e.g., `us-west-2`)
* **Access Key ID**: Your IAM user access key
* **Secret Access Key**: Your IAM user secret key
* **Prefix** (optional): A path prefix to organize files (e.g., `ecommerce-data/`)
* **Skip On Fail** (optional): Check to skip writing failed Runs to S3
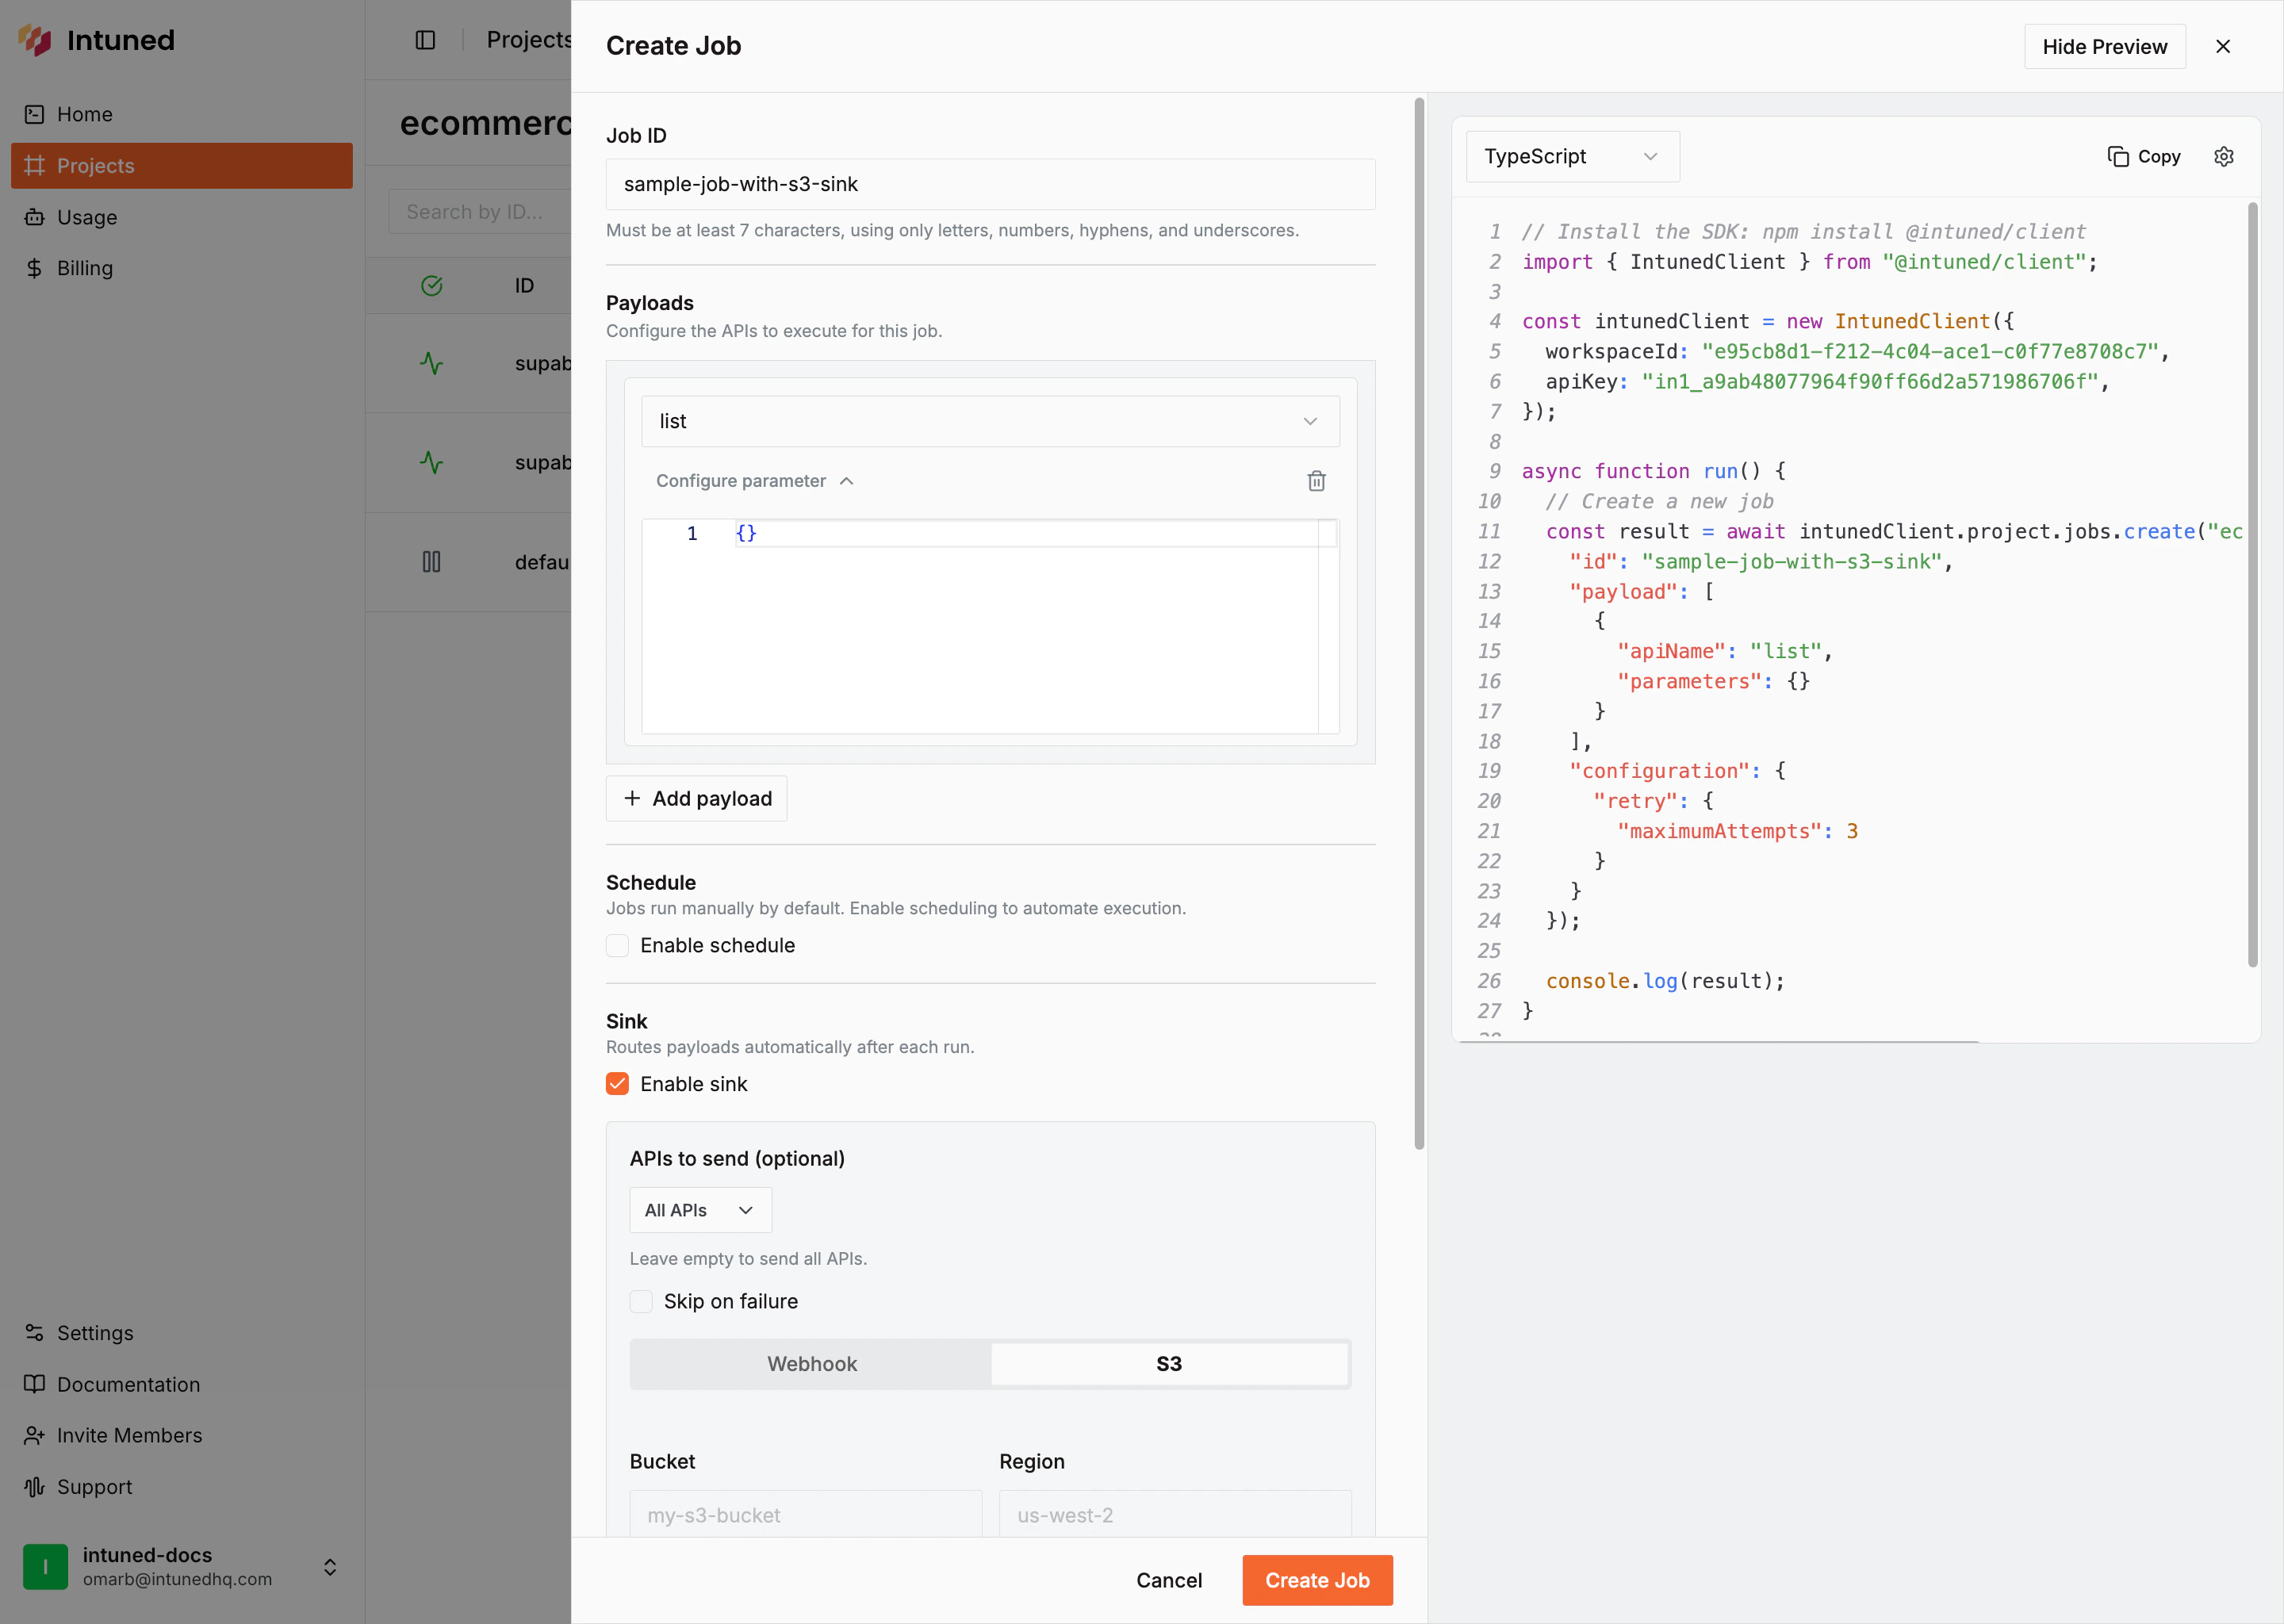 7. Select **Save** to create the Job.
```typescript theme={null}
import { IntunedClient } from '@intuned/client';
const intunedClient = new IntunedClient({
workspaceId: 'your-workspace-id',
apiKey: process.env.INTUNED_API_KEY ?? ''
});
async function createJobWithS3Sink() {
const result = await intunedClient.projects.jobs.create(
'ecommerce-scraper-quickstart',
{
id: 'default-with-s3',
payload: [
{
apiName: 'list',
parameters: {}
}
],
configuration: {
retry: {
maximumAttempts: 3
}
},
sink: {
type: 's3',
bucket: 'my-intuned-scraper-data',
region: 'us-west-2',
accessKeyId: process.env.AWS_ACCESS_KEY_ID!,
secretAccessKey: process.env.AWS_SECRET_ACCESS_KEY!,
prefix: 'ecommerce-data/',
skipOnFail: false
}
}
);
console.log('Job created with S3 sink:', result.id);
}
createJobWithS3Sink();
```
Store your AWS credentials in environment variables (`AWS_ACCESS_KEY_ID` and `AWS_SECRET_ACCESS_KEY`) rather than hardcoding them in your source code.
```python theme={null}
from intuned_client import IntunedClient
from intuned_client import models
import os
with IntunedClient(
workspace_id='your-workspace-id',
api_key=os.getenv('INTUNED_API_KEY', '')
) as ic_client:
result = ic_client.projects.jobs.create(
project_name='ecommerce-scraper-quickstart',
body=models.JobsCreateRequestBody(
id='default-with-s3',
payload=[
{
'apiName': 'list',
'parameters': {}
}
],
configuration={
'retry': {
'maximumAttempts': 3
}
},
sink={
'type': 's3',
'bucket': 'my-intuned-scraper-data',
'region': 'us-west-2',
'accessKeyId': os.getenv('AWS_ACCESS_KEY_ID'),
'secretAccessKey': os.getenv('AWS_SECRET_ACCESS_KEY'),
'prefix': 'ecommerce-data/',
'skipOnFail': False
}
)
)
print(f'Job created with S3 sink: {result.id}')
```
Store your AWS credentials in environment variables (`AWS_ACCESS_KEY_ID` and `AWS_SECRET_ACCESS_KEY`) rather than hardcoding them in your source code.
1. In the Jobs tab, find your new Job (`default-with-s3`)
2. Select **...** next to the Job
3. Select **Trigger**
The Job starts running immediately. You'll see the JobRun appear in the dashboard with status updates.
```typescript theme={null}
import { IntunedClient } from '@intuned/client';
const intunedClient = new IntunedClient({
workspaceId: 'your-workspace-id',
apiKey: process.env.INTUNED_API_KEY ?? ''
});
async function triggerJob() {
const result = await intunedClient.projects.jobs.trigger(
'ecommerce-scraper-quickstart',
'default-with-s3'
);
console.log(`JobRun started: ${result.id}`);
}
triggerJob();
```
```python theme={null}
from intuned_client import IntunedClient
import os
with IntunedClient(
workspace_id='your-workspace-id',
api_key=os.getenv('INTUNED_API_KEY', '')
) as ic_client:
result = ic_client.projects.jobs.trigger(
project_name='ecommerce-scraper-quickstart',
job_id='default-with-s3'
)
print(f'JobRun started: {result.id}')
```
After triggering:
1. **JobRun starts immediately** - Visible in the Intuned dashboard
2. **API Runs execute** - The `list` API runs first, then `details` APIs for each product
3. **Files written to S3** - When each API Run completes, Intuned writes a JSON file to your bucket
After the Job completes, view your data in S3:
1. Navigate to the [S3 Console](https://console.aws.amazon.com/s3)
2. Open your bucket (e.g., `my-intuned-scraper-data`)
3. Navigate to your prefix path if you specified one (e.g., `ecommerce-data/`)
**S3 file structure:**
Files are organized differently depending on whether you're using a Job sink or a Run sink:
* **Job sink**: `{prefix}/{jobId}/run-{jobRunId}/{apiRunId}.json`
* **Run sink**: `{prefix}/runs/{apiRunId}.json`
Since we're using a Job sink in this example, your files follow the Job sink pattern.
**What to expect:**
* One JSON file per API Run
* The initial `list` API Run has one file
* Each `details` API Run (created by `extendPayload`) has its own file
The ecommerce scraper uses `extendPayload` to create detail tasks for each discovered product. You'll see multiple files: one for the initial `list` Run, then one for each `details` Run.
**Example S3 payload:**
```json theme={null}
{
"workspaceId": "e95cb8d1-f212-4c04-ace1-c0f77e8708c7",
"apiInfo": {
"name": "details",
"runId": "656CxOdANRlR5lWUAt_eC",
"parameters": {
"detailsUrl": "https://www.scrapingcourse.com/ecommerce/product/abominable-hoodie/",
"name": "Abominable Hoodie"
},
"result": {
"status": "completed",
"result": [
{
"id": "prod-1",
"name": "Wireless Headphones",
"price": "$79.99"
},
{
"id": "prod-2",
"name": "Smart Watch",
"price": "$199.99"
}
],
"statusCode": 200
}
},
"project": {
"id": "482bf507-5fcc-43ed-9443-d8fff86015c4",
"name": "ecommerce-scraper-quickstart"
},
"projectJob": {
"id": "default"
},
"projectJobRun": {
"id": "08523ea6-5c6b-413e-995a-40e4f6fd7846"
}
}
```
If writing to S3 fails (e.g., due to incorrect credentials or insufficient permissions), Intuned **pauses the Job automatically**. The pause reason is "Failed to write to S3 sink". Check your credentials, fix the issue, and resume the Job from the dashboard.
### Configuration options
For full details on S3 sink configuration and available options, see the [S3 Sink API Reference](/client-apis/api-reference/sinks/s3).
Key configuration fields:
| Field | Required | Description |
| ----------------- | -------- | ------------------------------------------------------ |
| `bucket` | Yes | S3 bucket name |
| `region` | Yes | AWS region (e.g., `us-west-2`) |
| `accessKeyId` | Yes | AWS access key ID |
| `secretAccessKey` | Yes | AWS secret access key |
| `prefix` | No | Path prefix for organizing files |
| `skipOnFail` | No | Skip writing failed Runs to S3 (default: false) |
| `apisToSend` | No | List of specific API names to send (default: all APIs) |
| `endpoint` | No | Custom endpoint for S3-compatible services |
| `forcePathStyle` | No | Use path-style URLs for S3-compatible services |
## Processing data from S3
Once data lands in S3, you can process it in various ways depending on your needs.
A common pattern is using an **AWS Lambda** that triggers automatically when a new file arrives. Typical processing steps include:
* Normalizing the data structure
* Removing empty fields
* Validating against a schema
* Persisting to a database or data warehouse
Every company has different requirements—some use Athena for querying, others pipe data to Snowflake or BigQuery. Choose the approach that fits your data pipeline.
## Best practices
* **Use least privilege IAM policies**: Create a dedicated IAM user for Intuned with only `s3:PutObject` permission. Restrict access to specific bucket paths using resource ARNs. Never use root account credentials.
* **Organize data with prefixes**: Use meaningful prefix structures like `{environment}/{project-name}/{date}/` to make data easier to find, manage, and set lifecycle policies on.
* **Set up lifecycle policies**: Reduce storage costs by transitioning older data to S3 Glacier and deleting data you no longer need. This can reduce costs significantly for infrequently accessed data.
* **Monitor usage and costs**: Enable S3 Storage Lens for bucket-level insights, set up CloudWatch alarms for unexpected growth, and use Cost Explorer to track costs by bucket.
## Troubleshooting
### Job paused: "Failed to write to S3 sink"
**Cause:** Intuned automatically pauses the Job when it fails to write data to S3. Common reasons include invalid or expired AWS credentials, insufficient IAM permissions (missing `s3:PutObject`), incorrect bucket name or region, or the bucket doesn't exist.
**Solution:** Check the Job status in the Intuned dashboard (shows as "Paused"). Fix the underlying issue by verifying AWS credentials, ensuring IAM policy includes `s3:PutObject` permission, and confirming bucket name and region match your configuration. Test credentials with `aws s3 ls s3://your-bucket-name`. Update the Job configuration if needed, then select **Resume** from the dashboard. The Job continues from where it paused.
## Related resources
Complete API documentation for S3 sink configuration and options
Learn more about creating and managing batched Job executions
Learn about running single API executions outside of Jobs
Debug and monitor your automation runs with traces and logs
7. Select **Save** to create the Job.
```typescript theme={null}
import { IntunedClient } from '@intuned/client';
const intunedClient = new IntunedClient({
workspaceId: 'your-workspace-id',
apiKey: process.env.INTUNED_API_KEY ?? ''
});
async function createJobWithS3Sink() {
const result = await intunedClient.projects.jobs.create(
'ecommerce-scraper-quickstart',
{
id: 'default-with-s3',
payload: [
{
apiName: 'list',
parameters: {}
}
],
configuration: {
retry: {
maximumAttempts: 3
}
},
sink: {
type: 's3',
bucket: 'my-intuned-scraper-data',
region: 'us-west-2',
accessKeyId: process.env.AWS_ACCESS_KEY_ID!,
secretAccessKey: process.env.AWS_SECRET_ACCESS_KEY!,
prefix: 'ecommerce-data/',
skipOnFail: false
}
}
);
console.log('Job created with S3 sink:', result.id);
}
createJobWithS3Sink();
```
Store your AWS credentials in environment variables (`AWS_ACCESS_KEY_ID` and `AWS_SECRET_ACCESS_KEY`) rather than hardcoding them in your source code.
```python theme={null}
from intuned_client import IntunedClient
from intuned_client import models
import os
with IntunedClient(
workspace_id='your-workspace-id',
api_key=os.getenv('INTUNED_API_KEY', '')
) as ic_client:
result = ic_client.projects.jobs.create(
project_name='ecommerce-scraper-quickstart',
body=models.JobsCreateRequestBody(
id='default-with-s3',
payload=[
{
'apiName': 'list',
'parameters': {}
}
],
configuration={
'retry': {
'maximumAttempts': 3
}
},
sink={
'type': 's3',
'bucket': 'my-intuned-scraper-data',
'region': 'us-west-2',
'accessKeyId': os.getenv('AWS_ACCESS_KEY_ID'),
'secretAccessKey': os.getenv('AWS_SECRET_ACCESS_KEY'),
'prefix': 'ecommerce-data/',
'skipOnFail': False
}
)
)
print(f'Job created with S3 sink: {result.id}')
```
Store your AWS credentials in environment variables (`AWS_ACCESS_KEY_ID` and `AWS_SECRET_ACCESS_KEY`) rather than hardcoding them in your source code.
1. In the Jobs tab, find your new Job (`default-with-s3`)
2. Select **...** next to the Job
3. Select **Trigger**
The Job starts running immediately. You'll see the JobRun appear in the dashboard with status updates.
```typescript theme={null}
import { IntunedClient } from '@intuned/client';
const intunedClient = new IntunedClient({
workspaceId: 'your-workspace-id',
apiKey: process.env.INTUNED_API_KEY ?? ''
});
async function triggerJob() {
const result = await intunedClient.projects.jobs.trigger(
'ecommerce-scraper-quickstart',
'default-with-s3'
);
console.log(`JobRun started: ${result.id}`);
}
triggerJob();
```
```python theme={null}
from intuned_client import IntunedClient
import os
with IntunedClient(
workspace_id='your-workspace-id',
api_key=os.getenv('INTUNED_API_KEY', '')
) as ic_client:
result = ic_client.projects.jobs.trigger(
project_name='ecommerce-scraper-quickstart',
job_id='default-with-s3'
)
print(f'JobRun started: {result.id}')
```
After triggering:
1. **JobRun starts immediately** - Visible in the Intuned dashboard
2. **API Runs execute** - The `list` API runs first, then `details` APIs for each product
3. **Files written to S3** - When each API Run completes, Intuned writes a JSON file to your bucket
After the Job completes, view your data in S3:
1. Navigate to the [S3 Console](https://console.aws.amazon.com/s3)
2. Open your bucket (e.g., `my-intuned-scraper-data`)
3. Navigate to your prefix path if you specified one (e.g., `ecommerce-data/`)
**S3 file structure:**
Files are organized differently depending on whether you're using a Job sink or a Run sink:
* **Job sink**: `{prefix}/{jobId}/run-{jobRunId}/{apiRunId}.json`
* **Run sink**: `{prefix}/runs/{apiRunId}.json`
Since we're using a Job sink in this example, your files follow the Job sink pattern.
**What to expect:**
* One JSON file per API Run
* The initial `list` API Run has one file
* Each `details` API Run (created by `extendPayload`) has its own file
The ecommerce scraper uses `extendPayload` to create detail tasks for each discovered product. You'll see multiple files: one for the initial `list` Run, then one for each `details` Run.
**Example S3 payload:**
```json theme={null}
{
"workspaceId": "e95cb8d1-f212-4c04-ace1-c0f77e8708c7",
"apiInfo": {
"name": "details",
"runId": "656CxOdANRlR5lWUAt_eC",
"parameters": {
"detailsUrl": "https://www.scrapingcourse.com/ecommerce/product/abominable-hoodie/",
"name": "Abominable Hoodie"
},
"result": {
"status": "completed",
"result": [
{
"id": "prod-1",
"name": "Wireless Headphones",
"price": "$79.99"
},
{
"id": "prod-2",
"name": "Smart Watch",
"price": "$199.99"
}
],
"statusCode": 200
}
},
"project": {
"id": "482bf507-5fcc-43ed-9443-d8fff86015c4",
"name": "ecommerce-scraper-quickstart"
},
"projectJob": {
"id": "default"
},
"projectJobRun": {
"id": "08523ea6-5c6b-413e-995a-40e4f6fd7846"
}
}
```
If writing to S3 fails (e.g., due to incorrect credentials or insufficient permissions), Intuned **pauses the Job automatically**. The pause reason is "Failed to write to S3 sink". Check your credentials, fix the issue, and resume the Job from the dashboard.
### Configuration options
For full details on S3 sink configuration and available options, see the [S3 Sink API Reference](/client-apis/api-reference/sinks/s3).
Key configuration fields:
| Field | Required | Description |
| ----------------- | -------- | ------------------------------------------------------ |
| `bucket` | Yes | S3 bucket name |
| `region` | Yes | AWS region (e.g., `us-west-2`) |
| `accessKeyId` | Yes | AWS access key ID |
| `secretAccessKey` | Yes | AWS secret access key |
| `prefix` | No | Path prefix for organizing files |
| `skipOnFail` | No | Skip writing failed Runs to S3 (default: false) |
| `apisToSend` | No | List of specific API names to send (default: all APIs) |
| `endpoint` | No | Custom endpoint for S3-compatible services |
| `forcePathStyle` | No | Use path-style URLs for S3-compatible services |
## Processing data from S3
Once data lands in S3, you can process it in various ways depending on your needs.
A common pattern is using an **AWS Lambda** that triggers automatically when a new file arrives. Typical processing steps include:
* Normalizing the data structure
* Removing empty fields
* Validating against a schema
* Persisting to a database or data warehouse
Every company has different requirements—some use Athena for querying, others pipe data to Snowflake or BigQuery. Choose the approach that fits your data pipeline.
## Best practices
* **Use least privilege IAM policies**: Create a dedicated IAM user for Intuned with only `s3:PutObject` permission. Restrict access to specific bucket paths using resource ARNs. Never use root account credentials.
* **Organize data with prefixes**: Use meaningful prefix structures like `{environment}/{project-name}/{date}/` to make data easier to find, manage, and set lifecycle policies on.
* **Set up lifecycle policies**: Reduce storage costs by transitioning older data to S3 Glacier and deleting data you no longer need. This can reduce costs significantly for infrequently accessed data.
* **Monitor usage and costs**: Enable S3 Storage Lens for bucket-level insights, set up CloudWatch alarms for unexpected growth, and use Cost Explorer to track costs by bucket.
## Troubleshooting
### Job paused: "Failed to write to S3 sink"
**Cause:** Intuned automatically pauses the Job when it fails to write data to S3. Common reasons include invalid or expired AWS credentials, insufficient IAM permissions (missing `s3:PutObject`), incorrect bucket name or region, or the bucket doesn't exist.
**Solution:** Check the Job status in the Intuned dashboard (shows as "Paused"). Fix the underlying issue by verifying AWS credentials, ensuring IAM policy includes `s3:PutObject` permission, and confirming bucket name and region match your configuration. Test credentials with `aws s3 ls s3://your-bucket-name`. Update the Job configuration if needed, then select **Resume** from the dashboard. The Job continues from where it paused.
## Related resources
Complete API documentation for S3 sink configuration and options
Learn more about creating and managing batched Job executions
Learn about running single API executions outside of Jobs
Debug and monitor your automation runs with traces and logs