> ## Documentation Index
> Fetch the complete documentation index at: https://intunedhq.com/docs/llms.txt
> Use this file to discover all available pages before exploring further.
# Webhook
## Overview
By the end of this guide, you'll have an Intuned project (+ scraping Job with webhook sink) that sends scraped data directly to your endpoint. You'll:
1. Set up a webhook endpoint to receive data from Intuned.
2. Configure a Job with a webhook sink.
3. Trigger a Job and verify data arrives at your endpoint.
## Prerequisites
Before you begin, ensure you have the following:
* An Intuned account.
* A backend service capable of accepting HTTP POST requests.
* Your webhook endpoint exposed to the internet (publicly accessible URL).
This guide assumes you have a basic understanding of Intuned Projects and Jobs. If you're new to Intuned, start with the [getting started guide](/main/00-getting-started/introduction).
## When to use webhook integration
Scrapers built on Intuned typically run via Jobs on a schedule. When a JobRun completes, you want that data sent somewhere for processing.
Webhook integration delivers scraped data to your endpoint in real-time as each API Run completes. This enables instant processing without polling—your backend receives results the moment they're ready.
While this guide focuses on scraping, webhook integration works for any Intuned Job—webhooks deliver Run results from any automation.
## Guide
### 1. Set up a webhook endpoint
Add an endpoint to your backend that accepts POST requests from Intuned. The endpoint should parse JSON payloads and return a 200 status quickly to avoid timeouts.
#### Endpoint code
Add this route to your existing backend:
```typescript theme={null}
// Types for the webhook payload
interface WebhookPayload {
workspaceId: string;
project: { id: string; name: string };
projectJob: { id: string };
projectJobRun: { id: string };
apiInfo: {
name: string;
parameters: any;
runId: string;
result: {
status: 'completed' | 'failed';
result?: any;
error?: string;
message?: string;
};
};
}
// Add this endpoint to your Express app
app.post('/webhooks/intuned', async (req, res) => {
const payload = req.body as WebhookPayload;
console.log('Received webhook from Intuned');
console.log(`Project: ${payload.project.name}`);
console.log(`JobRun: ${payload.projectJobRun.id}`);
console.log(`Status: ${payload.apiInfo.result.status}`);
// Acknowledge receipt immediately
res.status(200).json({ received: true });
// Process the data asynchronously
processWebhookData(payload).catch(err => {
console.error('Error processing webhook:', err);
});
});
async function processWebhookData(payload: WebhookPayload) {
if (payload.apiInfo.result.status === 'completed') {
console.log('Data:', payload.apiInfo.result.result);
// Add your processing logic here
} else {
console.error('Failed:', payload.apiInfo.result.message);
}
}
```
```python theme={null}
from flask import request, jsonify
from typing import Dict, Any
# Add this route to your Flask app
@app.route('/webhooks/intuned', methods=['POST'])
def intuned_webhook():
payload: Dict[str, Any] = request.get_json()
app.logger.info('Received webhook from Intuned')
app.logger.info(f"Project: {payload['project']['name']}")
app.logger.info(f"JobRun: {payload['projectJobRun']['id']}")
app.logger.info(f"Status: {payload['apiInfo']['result']['status']}")
# Acknowledge receipt immediately
response = jsonify({'received': True})
# Process the data asynchronously
try:
process_webhook_data(payload)
except Exception as e:
app.logger.error(f'Error processing webhook: {e}')
return response, 200
def process_webhook_data(payload: Dict[str, Any]):
result = payload['apiInfo']['result']
if result['status'] == 'completed':
app.logger.info(f"Data: {result.get('result')}")
# Add your processing logic here
else:
app.logger.error(f"Failed: {result.get('message')}")
```
If you don't have an existing backend and want to test webhooks, create a minimal server:
```bash theme={null}
# Create a new directory
mkdir intuned-webhook-server && cd intuned-webhook-server
# Initialize project and install dependencies
npm init -y && npm pkg set type="module"
npm install express
npm install -D typescript @types/node @types/express
# Initialize TypeScript
npx tsc --init
```
Create `server.ts`:
```typescript theme={null}
import express from 'express';
const app = express();
app.use(express.json());
// Add the webhook endpoint code from above here
const PORT = process.env.PORT || 3000;
app.listen(PORT, () => {
console.log(`Webhook server running on port ${PORT}`);
});
```
Run the server:
```bash theme={null}
npx tsx server.ts
```
```bash theme={null}
# Create a new directory
mkdir intuned-webhook-server && cd intuned-webhook-server
# Initialize project and install Flask
uv init
uv add flask
```
Create `main.py`:
```python theme={null}
from flask import Flask, request, jsonify
from typing import Dict, Any
import logging
app = Flask(__name__)
logging.basicConfig(level=logging.INFO)
# Add the webhook endpoint code from above here
if __name__ == '__main__':
app.run(host='0.0.0.0', port=3000)
```
Run the server:
```bash theme={null}
uv run python main.py
```
#### Expose your endpoint (local testing only)
If you're testing locally, use a tunneling service to make your endpoint publicly accessible:
```bash theme={null}
# Using localtunnel (free)
npm install -g localtunnel
lt --port 3000
# Copy the HTTPS URL (e.g., https://hip-mugs-push.loca.lt)
```
Skip this step if your backend is already deployed and publicly accessible. For production, always use HTTPS endpoints.
#### Test your endpoint
Verify your endpoint is working:
```bash theme={null}
curl -X POST https://your-webhook-url.com/webhooks/intuned \
-H "Content-Type: application/json" \
-d '{
"workspaceId": "ws_test",
"project": { "id": "proj_test", "name": "Test Project" },
"projectJob": { "id": "job_test" },
"projectJobRun": { "id": "jr_test" },
"apiInfo": {
"name": "extract_data",
"parameters": { "url": "https://example.com" },
"runId": "run_test",
"result": {
"status": "completed",
"result": { "data": "Sample extracted data" }
}
}
}'
```
You should see the test data logged in your server console.
### 2. Configure a Job with a webhook sink
You can use an existing project or create a new one.
For this example, we'll use the `ecommerce-scraper-quickstart` project that you can deploy using the [Deploy your first scraper](/main/00-getting-started/quickstarts/scraper) quickstart tutorial.
1. Go to [app.intuned.io](https://app.intuned.io)
2. Open your `ecommerce-scraper-quickstart` project
3. Select the **Jobs** tab
4. Select Create Job
5. Fill in the Job ID and payloads
* Set Job ID to: `default-with-webhook`
* Set payload api to `list` and empty parameter object `{}`
6. Enable sink configuration and add your webhook details with the following fields:
* **Type**: `webhook`
* **URL**: Your webhook endpoint URL (e.g., `https://your-domain.com/webhooks/intuned`)
* **Headers** (optional): Custom headers for authentication (e.g., `{"Authorization": "Bearer your-secret-token"}`)
* **Retry** (optional): Number of retry attempts on failure (default: 3)
* **Timeout** (optional): Request timeout in milliseconds (default: 5000)
Always use HTTPS endpoints in production to ensure data security. Store authentication tokens in environment variables rather than hardcoding them.
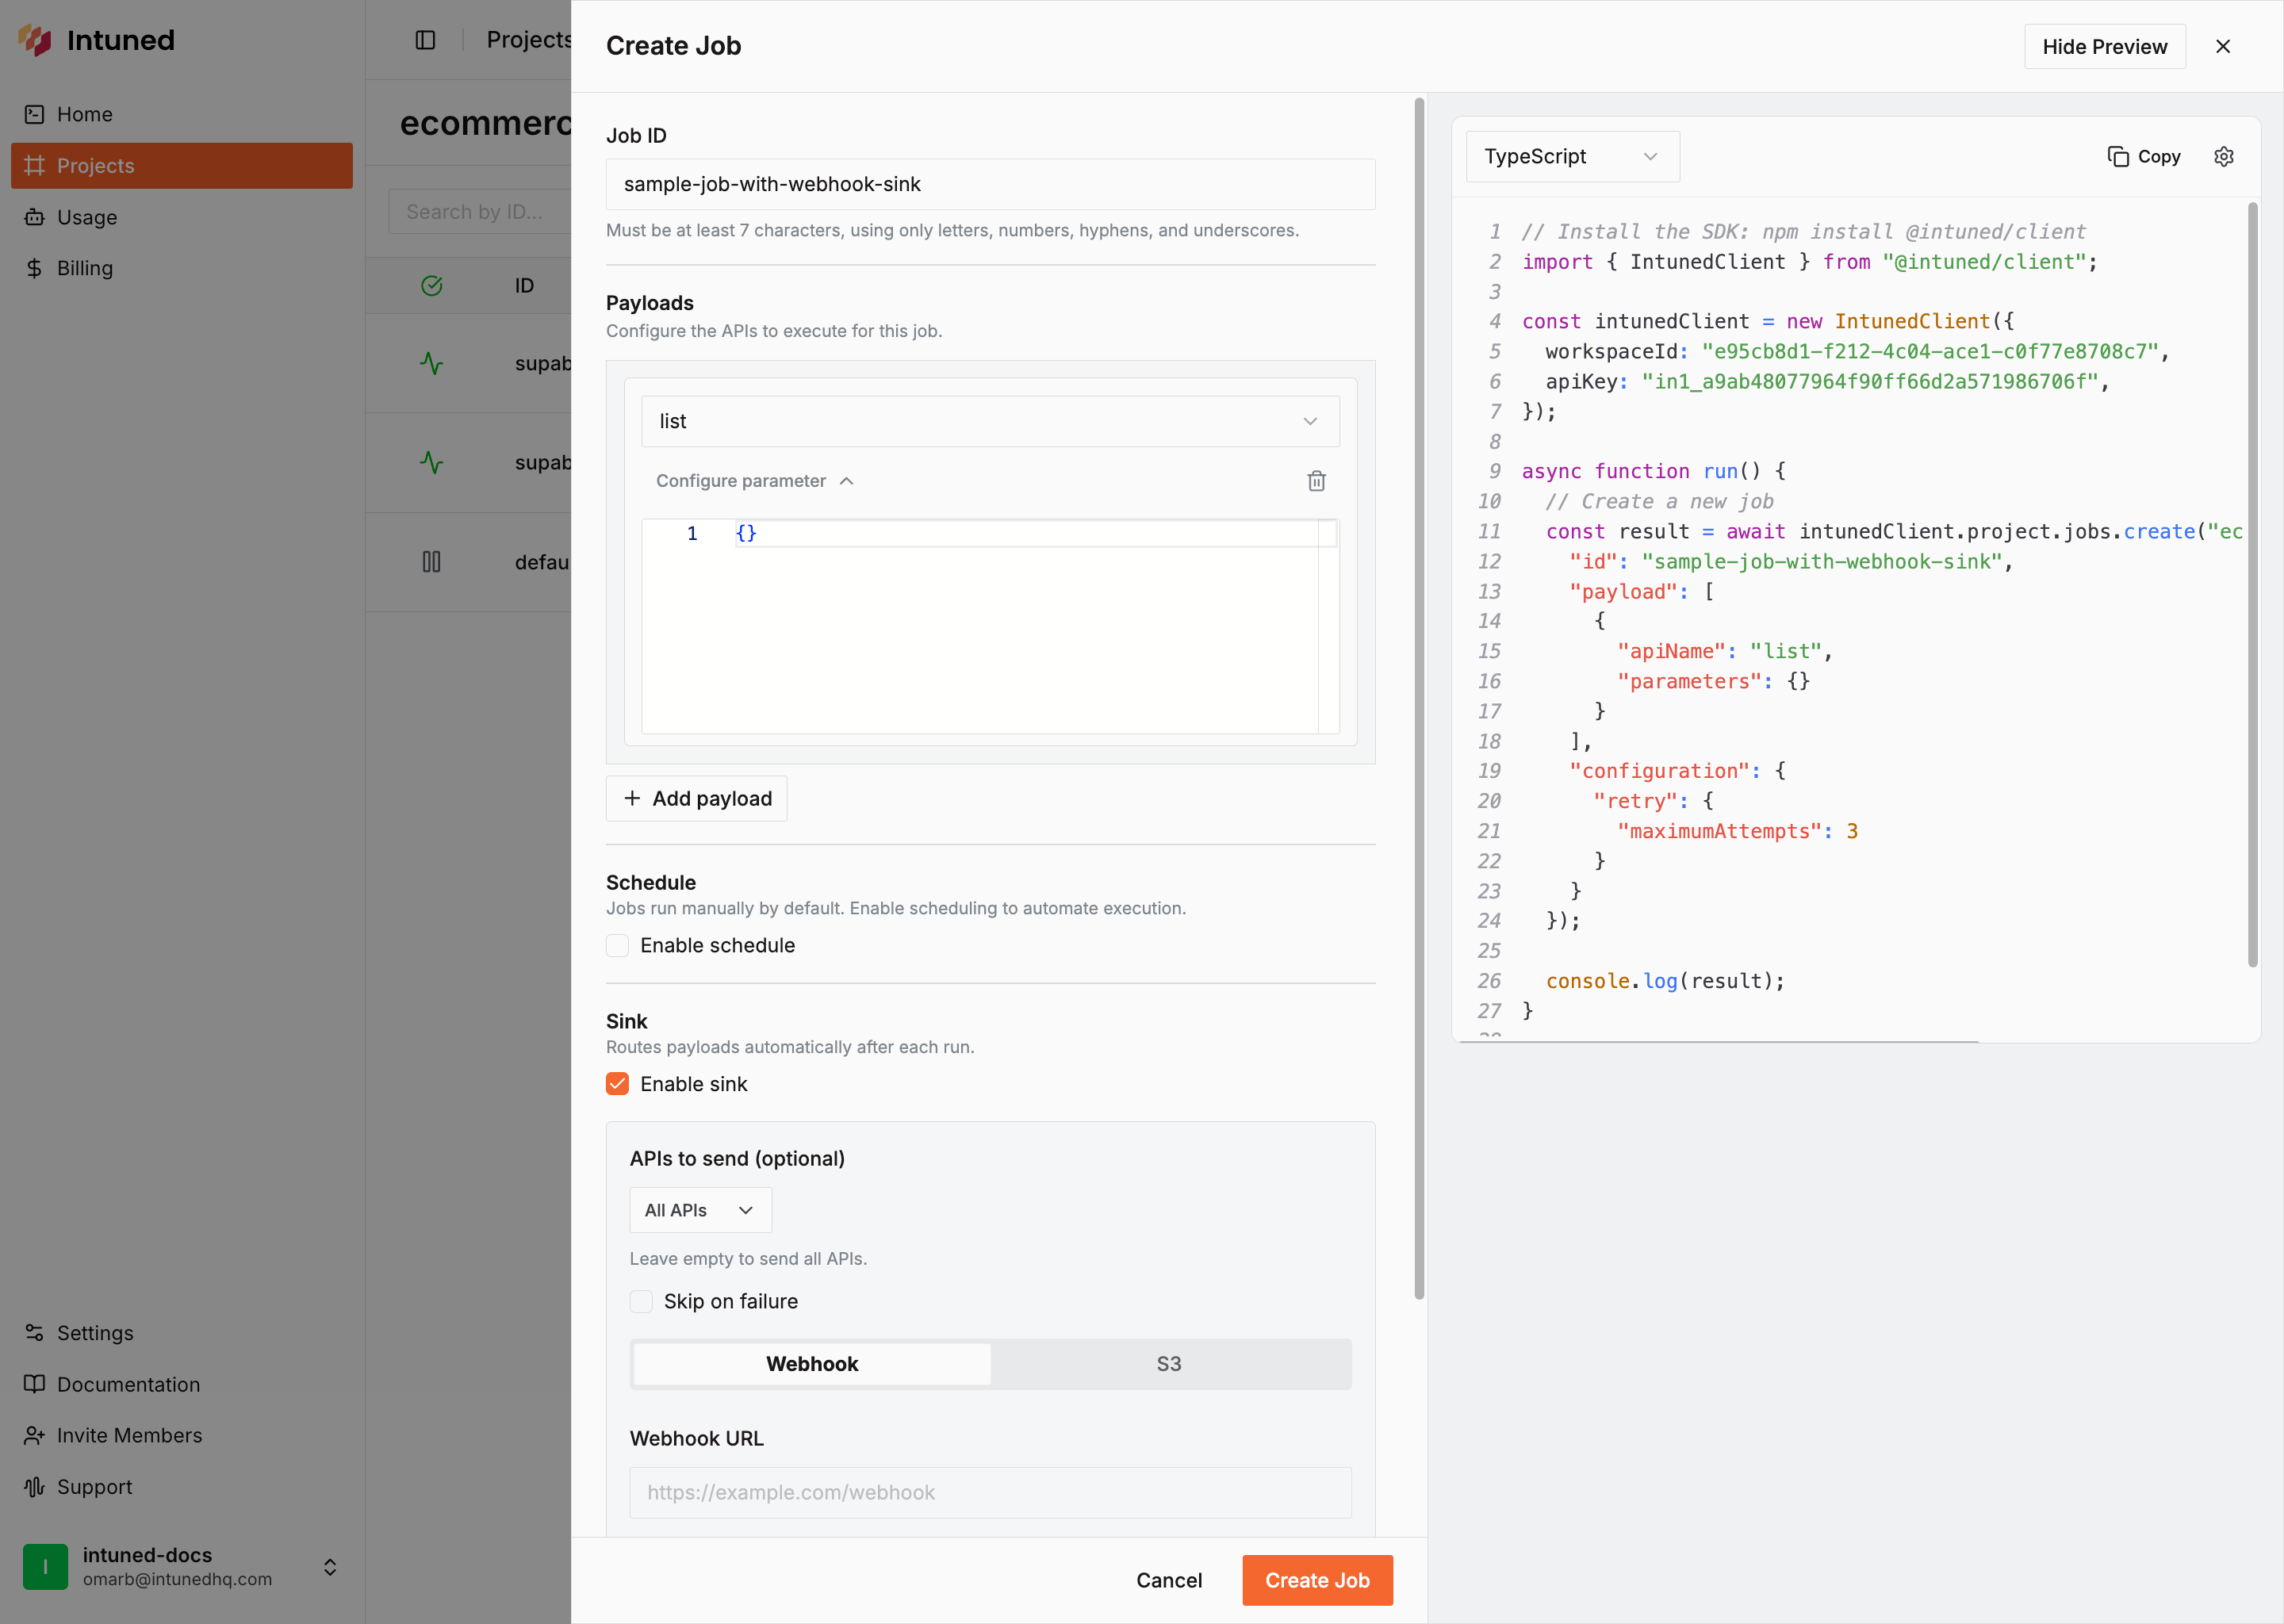 7. Select **Save** to create the Job.
```typescript theme={null}
import { IntunedClient } from "@intuned/client";
const intunedClient = new IntunedClient({
workspaceId: "your-workspace-id",
apiKey: process.env["INTUNED_API_KEY"] ?? "",
});
async function createJobWithWebhookSink() {
const result = await intunedClient.projects.jobs.create(
"ecommerce-scraper-quickstart",
{
id: "default-with-webhook",
payload: [
{
apiName: "list",
parameters: {},
},
],
configuration: {
retry: {
maximumAttempts: 3,
},
},
sink: {
type: "webhook",
url: "https://your-webhook-url.com/webhooks/intuned",
headers: {
Authorization: "Bearer your-secret-token",
},
},
}
);
console.log(result);
}
createJobWithWebhookSink();
```
Always use HTTPS endpoints in production to ensure data security. Store authentication tokens in environment variables rather than hardcoding them.
```python theme={null}
from intuned_client import IntunedClient
from intuned_client import models
import os
with IntunedClient(
workspace_id="your-workspace-id",
api_key=os.getenv("INTUNED_API_KEY", ""),
) as ic_client:
result = ic_client.projects.jobs.create(
project_name="ecommerce-scraper-quickstart",
body=models.JobsCreateRequestBody(
id="default-with-webhook",
payload=[
{
"apiName": "list",
"parameters": {},
},
],
configuration={
"retry": {
"maximumAttempts": 3,
},
},
sink={
"type": "webhook",
"url": "https://your-webhook-url.com/webhooks/intuned",
"headers": {
"Authorization": "Bearer your-secret-token",
},
},
),
)
print(result)
```
Always use HTTPS endpoints in production to ensure data security. Store authentication tokens in environment variables rather than hardcoding them.
1. In the Jobs tab, find the Job you created
2. Select **...** next to the Job
3. Select **Trigger**
The Job starts running immediately. You'll see the JobRun appear in the dashboard with status updates.
```typescript theme={null}
import { IntunedClient } from "@intuned/client";
const intunedClient = new IntunedClient({
workspaceId: "your-workspace-id",
apiKey: process.env["INTUNED_API_KEY"] ?? "",
});
async function triggerJob() {
const result = await intunedClient.projects.jobs.trigger(
"ecommerce-scraper-quickstart",
"default-with-webhook"
);
console.log(`JobRun started: ${result.id}`);
console.log(`Monitor at: https://app.intuned.io/workspaces/your-workspace-id/projects/ecommerce-scraper-quickstart/jobs/default-with-webhook/${result.id}`);
}
triggerJob();
```
```python theme={null}
from intuned_client import IntunedClient
import os
with IntunedClient(
workspace_id="your-workspace-id",
api_key=os.getenv("INTUNED_API_KEY", ""),
) as ic_client:
result = ic_client.projects.jobs.trigger(
project_name="ecommerce-scraper-quickstart",
job_id="default-with-webhook"
)
print(f"JobRun started: {result.id}")
print(f"Monitor at: https://app.intuned.io/workspaces/your-workspace-id/projects/ecommerce-scraper-quickstart/jobs/default-with-webhook/{result.id}")
```
After triggering the Job:
1. **Job starts immediately** - Visible in Intuned dashboard
2. **API Runs execute** - The `list` API runs first, then `details` APIs for each product
3. **Webhooks deliver** - When each API Run completes, Intuned sends a webhook to your endpoint
The ecommerce scraper uses `extendPayload` to create detail tasks for each discovered product. You'll receive multiple webhooks: one for the initial `list` Run, then one for each `details` Run as they complete.
If webhook delivery fails, Intuned retries with exponential backoff for up to 1 hour. Unlike S3/R2 sinks, webhook failures don't pause the Job; the Job continues and undelivered webhooks are skipped after all retries are exhausted. For detailed retry behavior, see [Sink Retry Behavior](/main/05-references/sink-retry-behavior).
Check your webhook endpoint logs - you should see payloads with this structure:
```json theme={null}
{
"workspaceId": "e95cb8d1-f212-4c04-ace1-c0f77e8708c7",
"apiInfo": {
"name": "details",
"runId": "656CxOdANRlR5lWUAt_eC",
"parameters": {
"detailsUrl": "https://www.scrapingcourse.com/ecommerce/product/abominable-hoodie/",
"name": "Abominable Hoodie"
},
"result": {
"status": "completed",
"result": [
{
"id": "prod-1",
"name": "Wireless Headphones",
"price": "$79.99"
},
{
"id": "prod-2",
"name": "Smart Watch",
"price": "$199.99"
}
],
"statusCode": 200
}
},
"project": {
"id": "482bf507-5fcc-43ed-9443-d8fff86015c4",
"name": "ecommerce-scraper-quickstart"
},
"projectJob": {
"id": "default-with-webhook"
},
"projectJobRun": {
"id": "08523ea6-5c6b-413e-995a-40e4f6fd7846"
}
}
```
### Configuration options
For full details on webhook API schema and available configuration options, see the [API Reference](/client-apis/api-reference/sinks/webhook).
Key configuration fields:
| Field | Required | Description |
| ------------ | -------- | ----------------------------------------------------------------------------- |
| `type` | Yes | Must be `"webhook"` |
| `url` | Yes | Your webhook endpoint URL (HTTPS recommended) |
| `headers` | No | Custom headers for authentication (e.g., `{"Authorization": "Bearer token"}`) |
| `retry` | No | Number of retry attempts on failure (default: 3) |
| `timeout` | No | Request timeout in milliseconds (default: 5000) |
| `skipOnFail` | No | Skip sending failed Runs to webhook (default: false) |
| `apisToSend` | No | List of specific API names to send (default: all APIs) |
## Common data processing patterns
After receiving webhook data, you'll typically want to process it. Here are common patterns:
* **Store in a database**: Parse the extracted data and upsert records. Use the `runId` as a unique key to handle duplicates from webhook retries.
* **Validate and clean**: Check data structure and clean values before processing. Filter out malformed records and log validation errors for debugging.
* **Send to monitoring**: Route failures to error tracking services (Sentry, Datadog) for debugging. Track metrics like success rates and processing times.
* **Trigger downstream workflows**: Use webhook data to kick off additional processes—update other services, publish to message queues, or send notifications based on the results.
## Best practices
* **Respond quickly**: Return a 200 status within 5 seconds. Process data asynchronously after responding to prevent Intuned from timing out and retrying.
* **Secure your endpoint**: Use HTTPS in production. Verify the `Authorization` header matches your secret and validate payload structure before processing.
* **Handle idempotency**: Webhook deliveries may be retried. Use the `runId` field as a deduplication key to avoid processing the same Run twice.
* **Monitor webhook health**: Log received webhooks with timestamps, alert if none arrive within expected schedule, and track processing error rates.
## Troubleshooting
### Webhooks not being received
**Cause:** Endpoint URL is incorrect, not publicly accessible, or blocked by firewall/SSL issues.
**Solution:** Test endpoint accessibility with `curl` from an external server. Check server logs for incoming requests and verify the webhook URL in your Intuned Job configuration.
### Webhook timeout errors
**Cause:** Your endpoint takes too long to respond (>5 seconds).
**Solution:** Return 200 status immediately, then process data asynchronously using background jobs or queues.
### Authentication failures
**Cause:** Authorization header mismatch between Job configuration and endpoint validation.
**Solution:** Verify the header name and value in your Job configuration. Check for extra spaces or encoding issues in the secret token.
### Duplicate webhook deliveries
**Cause:** Intuned retries on slow responses or network issues.
**Solution:** Implement idempotency using the `runId` field from the payload as a deduplication key.
## Related resources
Complete API documentation for creating and managing Jobs
Learn more about executing and monitoring JobRuns
Best practices for validating and ensuring data quality
Learn more about executing and monitoring single API Runs
7. Select **Save** to create the Job.
```typescript theme={null}
import { IntunedClient } from "@intuned/client";
const intunedClient = new IntunedClient({
workspaceId: "your-workspace-id",
apiKey: process.env["INTUNED_API_KEY"] ?? "",
});
async function createJobWithWebhookSink() {
const result = await intunedClient.projects.jobs.create(
"ecommerce-scraper-quickstart",
{
id: "default-with-webhook",
payload: [
{
apiName: "list",
parameters: {},
},
],
configuration: {
retry: {
maximumAttempts: 3,
},
},
sink: {
type: "webhook",
url: "https://your-webhook-url.com/webhooks/intuned",
headers: {
Authorization: "Bearer your-secret-token",
},
},
}
);
console.log(result);
}
createJobWithWebhookSink();
```
Always use HTTPS endpoints in production to ensure data security. Store authentication tokens in environment variables rather than hardcoding them.
```python theme={null}
from intuned_client import IntunedClient
from intuned_client import models
import os
with IntunedClient(
workspace_id="your-workspace-id",
api_key=os.getenv("INTUNED_API_KEY", ""),
) as ic_client:
result = ic_client.projects.jobs.create(
project_name="ecommerce-scraper-quickstart",
body=models.JobsCreateRequestBody(
id="default-with-webhook",
payload=[
{
"apiName": "list",
"parameters": {},
},
],
configuration={
"retry": {
"maximumAttempts": 3,
},
},
sink={
"type": "webhook",
"url": "https://your-webhook-url.com/webhooks/intuned",
"headers": {
"Authorization": "Bearer your-secret-token",
},
},
),
)
print(result)
```
Always use HTTPS endpoints in production to ensure data security. Store authentication tokens in environment variables rather than hardcoding them.
1. In the Jobs tab, find the Job you created
2. Select **...** next to the Job
3. Select **Trigger**
The Job starts running immediately. You'll see the JobRun appear in the dashboard with status updates.
```typescript theme={null}
import { IntunedClient } from "@intuned/client";
const intunedClient = new IntunedClient({
workspaceId: "your-workspace-id",
apiKey: process.env["INTUNED_API_KEY"] ?? "",
});
async function triggerJob() {
const result = await intunedClient.projects.jobs.trigger(
"ecommerce-scraper-quickstart",
"default-with-webhook"
);
console.log(`JobRun started: ${result.id}`);
console.log(`Monitor at: https://app.intuned.io/workspaces/your-workspace-id/projects/ecommerce-scraper-quickstart/jobs/default-with-webhook/${result.id}`);
}
triggerJob();
```
```python theme={null}
from intuned_client import IntunedClient
import os
with IntunedClient(
workspace_id="your-workspace-id",
api_key=os.getenv("INTUNED_API_KEY", ""),
) as ic_client:
result = ic_client.projects.jobs.trigger(
project_name="ecommerce-scraper-quickstart",
job_id="default-with-webhook"
)
print(f"JobRun started: {result.id}")
print(f"Monitor at: https://app.intuned.io/workspaces/your-workspace-id/projects/ecommerce-scraper-quickstart/jobs/default-with-webhook/{result.id}")
```
After triggering the Job:
1. **Job starts immediately** - Visible in Intuned dashboard
2. **API Runs execute** - The `list` API runs first, then `details` APIs for each product
3. **Webhooks deliver** - When each API Run completes, Intuned sends a webhook to your endpoint
The ecommerce scraper uses `extendPayload` to create detail tasks for each discovered product. You'll receive multiple webhooks: one for the initial `list` Run, then one for each `details` Run as they complete.
If webhook delivery fails, Intuned retries with exponential backoff for up to 1 hour. Unlike S3/R2 sinks, webhook failures don't pause the Job; the Job continues and undelivered webhooks are skipped after all retries are exhausted. For detailed retry behavior, see [Sink Retry Behavior](/main/05-references/sink-retry-behavior).
Check your webhook endpoint logs - you should see payloads with this structure:
```json theme={null}
{
"workspaceId": "e95cb8d1-f212-4c04-ace1-c0f77e8708c7",
"apiInfo": {
"name": "details",
"runId": "656CxOdANRlR5lWUAt_eC",
"parameters": {
"detailsUrl": "https://www.scrapingcourse.com/ecommerce/product/abominable-hoodie/",
"name": "Abominable Hoodie"
},
"result": {
"status": "completed",
"result": [
{
"id": "prod-1",
"name": "Wireless Headphones",
"price": "$79.99"
},
{
"id": "prod-2",
"name": "Smart Watch",
"price": "$199.99"
}
],
"statusCode": 200
}
},
"project": {
"id": "482bf507-5fcc-43ed-9443-d8fff86015c4",
"name": "ecommerce-scraper-quickstart"
},
"projectJob": {
"id": "default-with-webhook"
},
"projectJobRun": {
"id": "08523ea6-5c6b-413e-995a-40e4f6fd7846"
}
}
```
### Configuration options
For full details on webhook API schema and available configuration options, see the [API Reference](/client-apis/api-reference/sinks/webhook).
Key configuration fields:
| Field | Required | Description |
| ------------ | -------- | ----------------------------------------------------------------------------- |
| `type` | Yes | Must be `"webhook"` |
| `url` | Yes | Your webhook endpoint URL (HTTPS recommended) |
| `headers` | No | Custom headers for authentication (e.g., `{"Authorization": "Bearer token"}`) |
| `retry` | No | Number of retry attempts on failure (default: 3) |
| `timeout` | No | Request timeout in milliseconds (default: 5000) |
| `skipOnFail` | No | Skip sending failed Runs to webhook (default: false) |
| `apisToSend` | No | List of specific API names to send (default: all APIs) |
## Common data processing patterns
After receiving webhook data, you'll typically want to process it. Here are common patterns:
* **Store in a database**: Parse the extracted data and upsert records. Use the `runId` as a unique key to handle duplicates from webhook retries.
* **Validate and clean**: Check data structure and clean values before processing. Filter out malformed records and log validation errors for debugging.
* **Send to monitoring**: Route failures to error tracking services (Sentry, Datadog) for debugging. Track metrics like success rates and processing times.
* **Trigger downstream workflows**: Use webhook data to kick off additional processes—update other services, publish to message queues, or send notifications based on the results.
## Best practices
* **Respond quickly**: Return a 200 status within 5 seconds. Process data asynchronously after responding to prevent Intuned from timing out and retrying.
* **Secure your endpoint**: Use HTTPS in production. Verify the `Authorization` header matches your secret and validate payload structure before processing.
* **Handle idempotency**: Webhook deliveries may be retried. Use the `runId` field as a deduplication key to avoid processing the same Run twice.
* **Monitor webhook health**: Log received webhooks with timestamps, alert if none arrive within expected schedule, and track processing error rates.
## Troubleshooting
### Webhooks not being received
**Cause:** Endpoint URL is incorrect, not publicly accessible, or blocked by firewall/SSL issues.
**Solution:** Test endpoint accessibility with `curl` from an external server. Check server logs for incoming requests and verify the webhook URL in your Intuned Job configuration.
### Webhook timeout errors
**Cause:** Your endpoint takes too long to respond (>5 seconds).
**Solution:** Return 200 status immediately, then process data asynchronously using background jobs or queues.
### Authentication failures
**Cause:** Authorization header mismatch between Job configuration and endpoint validation.
**Solution:** Verify the header name and value in your Job configuration. Check for extra spaces or encoding issues in the secret token.
### Duplicate webhook deliveries
**Cause:** Intuned retries on slow responses or network issues.
**Solution:** Implement idempotency using the `runId` field from the payload as a deduplication key.
## Related resources
Complete API documentation for creating and managing Jobs
Learn more about executing and monitoring JobRuns
Best practices for validating and ensuring data quality
Learn more about executing and monitoring single API Runs