

Overview
By the end of this guide, you’ll have an authenticated Intuned project that uses credentials stored securely in 1Password. You’ll learn how to:- Set up a 1Password account and create a vault for Intuned to access.
- Set up a 1Password Service Account to access your vault programmatically.
- Enable and configure 1Password integration in your Intuned project.
- Create AuthSessions using credentials from 1Password.
Prerequisites
Before you begin, ensure you have the following:- An active Intuned account.
- A 1Password account with permissions to create vaults and service accounts.
This guide assumes you have a basic understanding of Intuned Projects and AuthSessions. If you’re new to Intuned, start with the getting started guide.
When to use 1Password integration
When you create an AuthSession, you provide credentials for logging into the target website. Intuned stores these credentials securely to renew the AuthSession when it expires. However:- You may prefer not to store sensitive credentials directly in Intuned.
- If credentials change frequently, you need to update them manually through Intuned APIs.
- Sharing credentials across Projects or AuthSessions requires duplicating them.
- Keep credentials in 1Password instead of Intuned.
- Fetch the latest credentials automatically when needed.
- Share credentials across Projects and AuthSessions without duplication.
Guide
1. Create a 1Password Vault with credentials
- 1Password App (Desktop)
- 1password.com
- 1Password CLI
- Open the 1Password app and sign in to your account.
- Under Vaults, select +.
- Enter name:
intuned-automation-credentialsand optionally a description. - Select Create.
- Add a new item:
- Select Login
- Name it
example-login - Username:
demo@email.com - Password:
DemoUser2024!
op://intuned-automation-credentials/example-login/username and op://intuned-automation-credentials/example-login/password. You’ll use these paths later to reference the credentials in Intuned.
2. Create a 1Password Service Account
Creating a service account requires admin access to your 1Password account.
- 1password.com
- 1Password CLI
- Open the 1Password service account creation wizard.
- Follow the instructions:
- Enter a name for your service account.
- Choose the vault you created earlier.
- Make sure you give read access to the vault.
- Select Create Account.
- (Optional) Select Save in 1Password to save the service account token in your 1Password account.
1Password Service Accounts have rate limits. Intuned reads from the vault when creating or renewing AuthSessions, and each time your code calls
getAuthSessionParameters. Check out 1Password service account rate limits for more details.3. Set up 1Password Service Account Token on Intuned
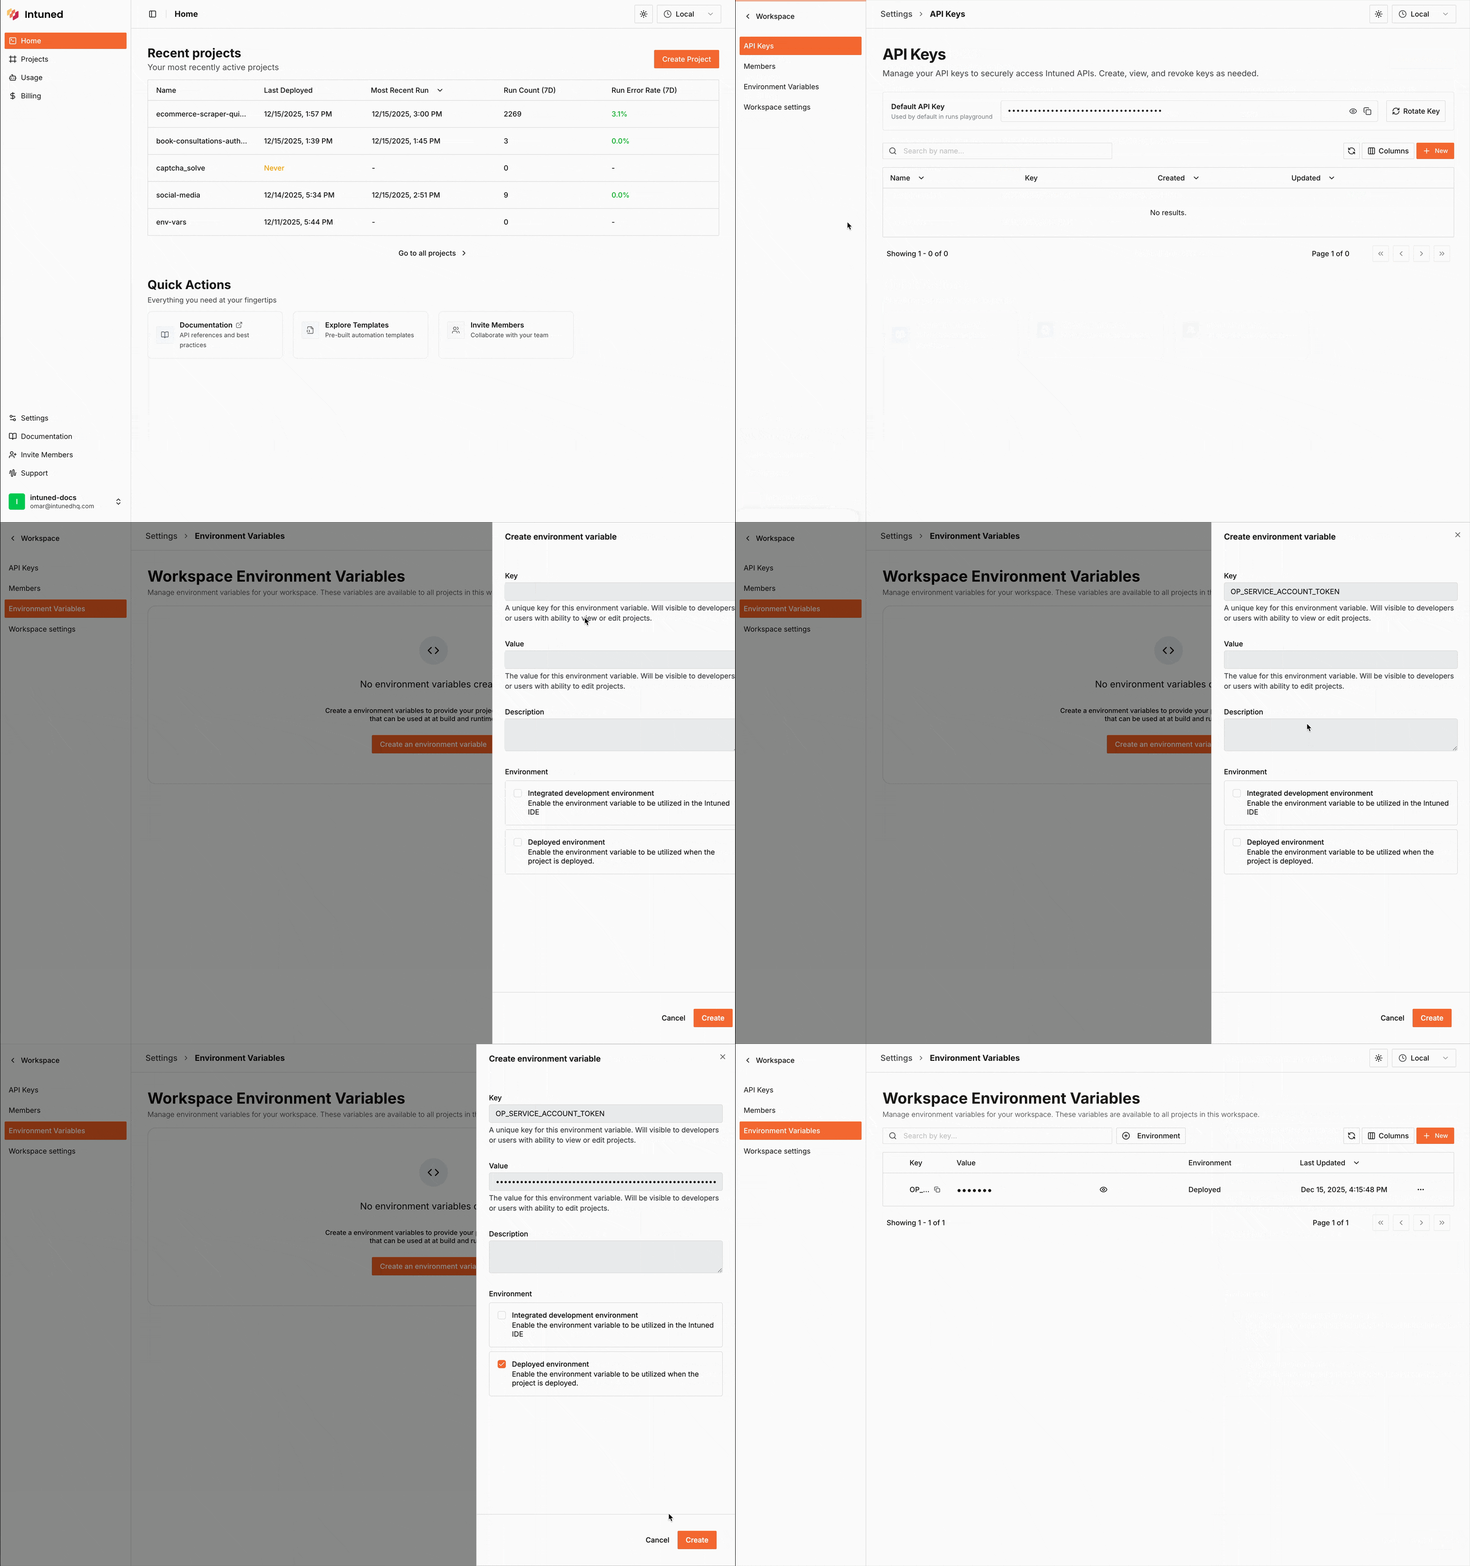
Set up your 1Password Service Account token as a Workspace Environment Variable:- Go to Workspace Settings > Environment Variables.
- Create a new variable with:
- Key:
OP_SERVICE_ACCOUNT_TOKEN - Value: Your 1Password Service Account token from step 2.
- Environments: Deployed environment, so deployed Projects can read from 1Password. Also select Development environment to use the token with the Intuned Agent and the CLI while you build.
- Key:
You can set up the token as a Project Environment Variable if you do not want to share the 1Password Service Account across Projects. Check out Project-level environment variables for more details.
For security reasons,
OP_SERVICE_ACCOUNT_TOKEN will not be exposed to your automation code. If you want to use the 1Password SDK in your code, use a different environment variable key at your own risk.4. Create a Project with AuthSessions and 1Password integration enabled
For this guide, we use the Book consultations authenticated quickstart project which is therpa-auth-example template. Follow the quickstart guide to create it. You should now have a project named book-consultations-authenticated-quickstart.
Let’s enable 1Password integration for the Project and deploy it.
- Online IDE
- CLI
Open your project in the IDE. From Files, select Intuned.json, then enable 1Password integration. Optionally add an integration name and version.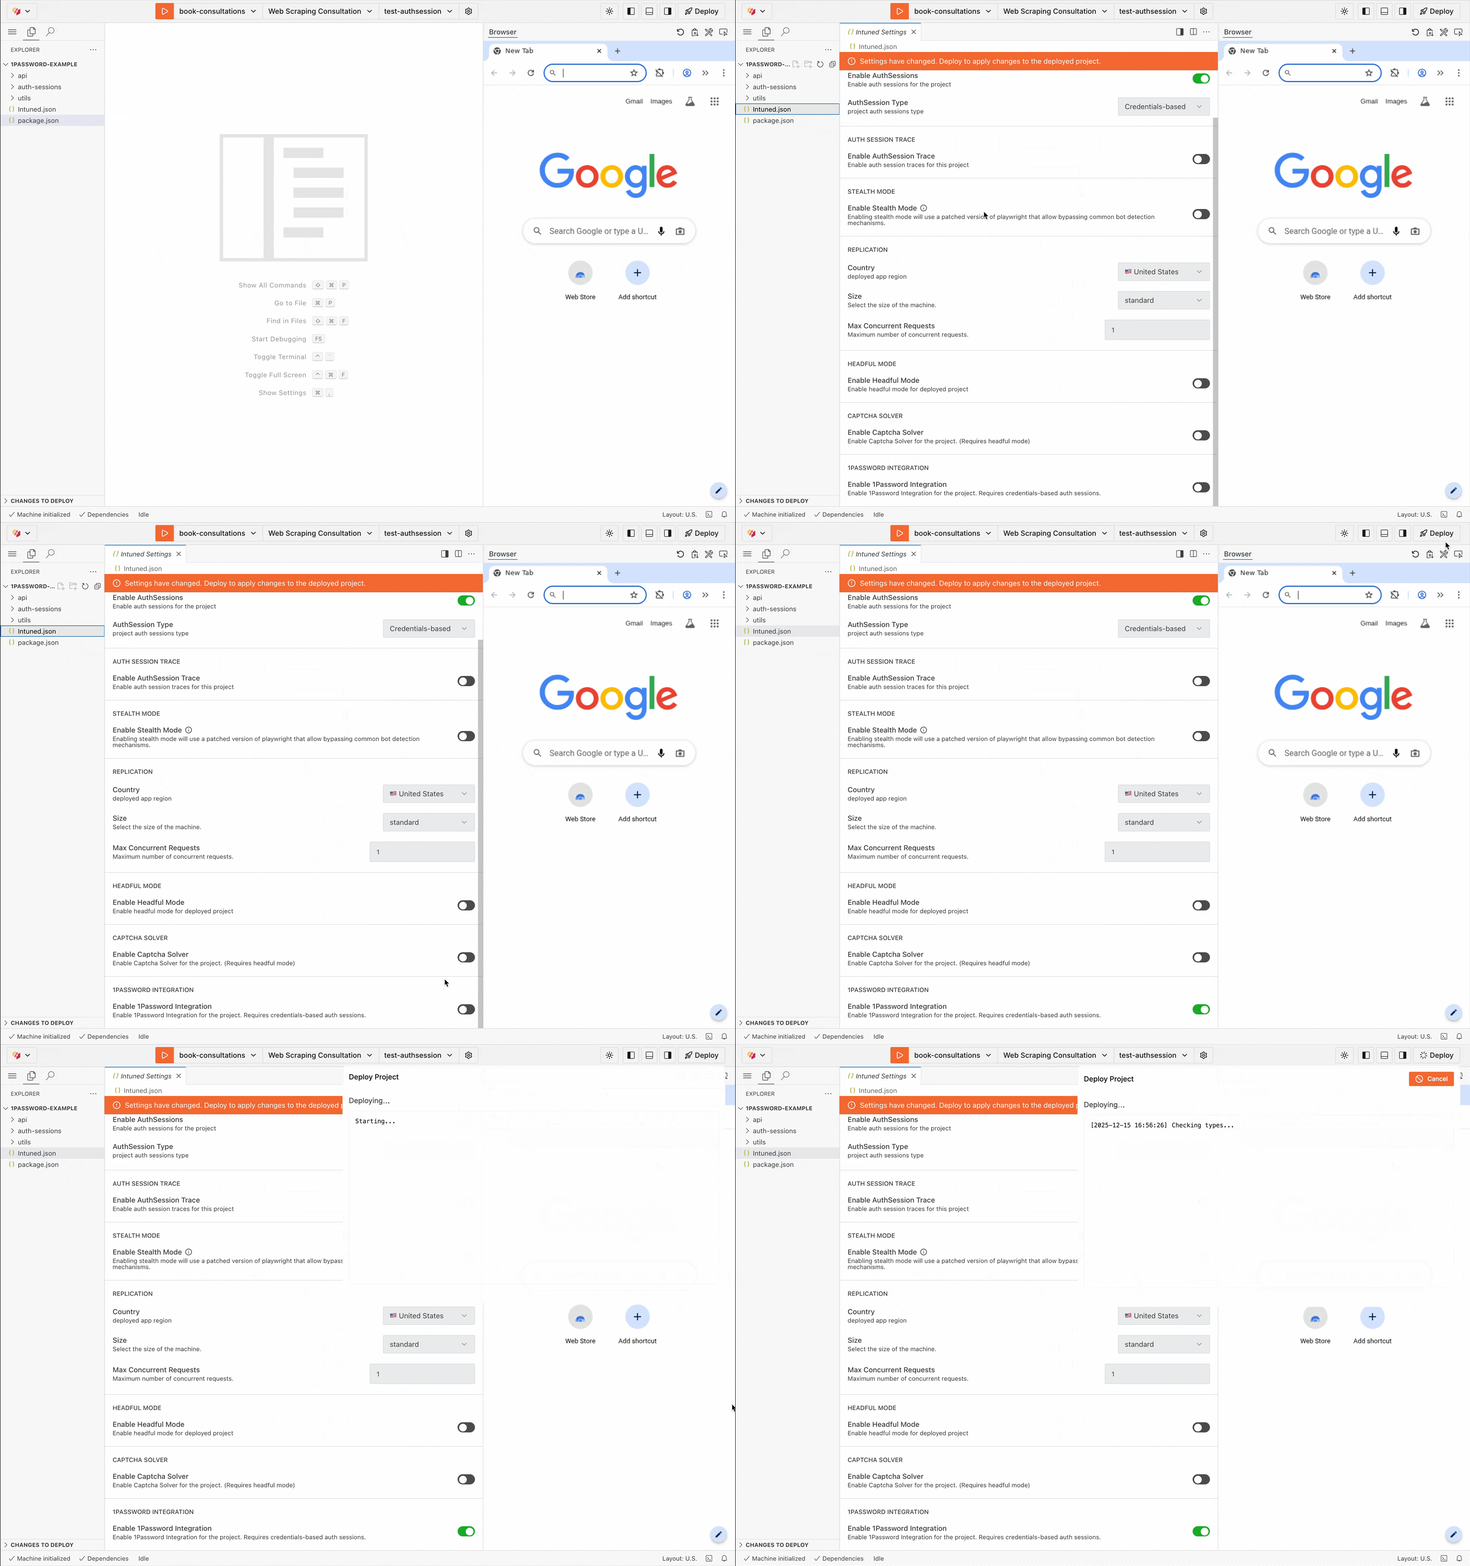
The
integrationName and integrationVersion fields are optional identifiers used by the 1Password SDK for tracking.1Password references are resolved only for credentials-based AuthSessions, so AuthSessions must be enabled with type
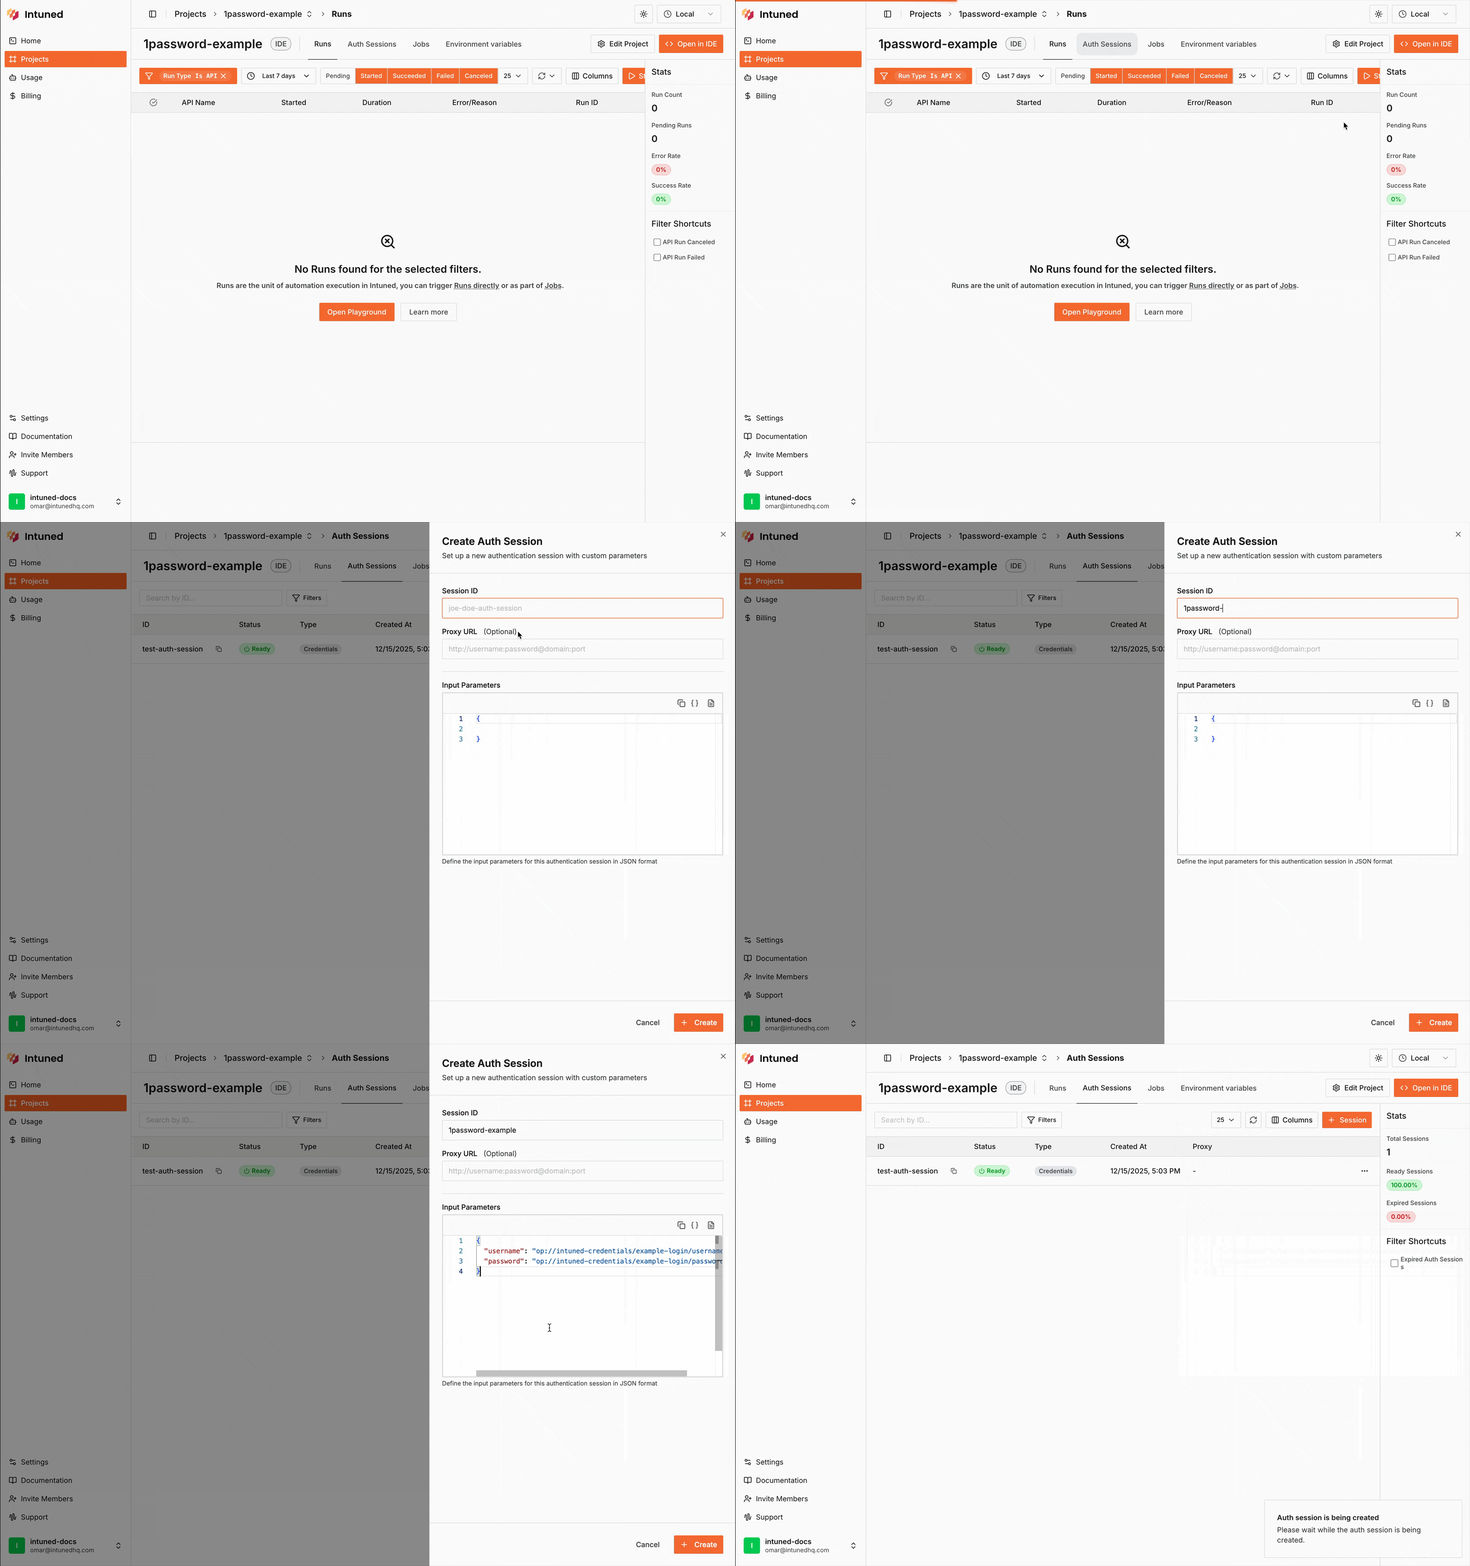
API in your Intuned settings.5. Create an AuthSession using 1Password credentials
- API
- Dashboard
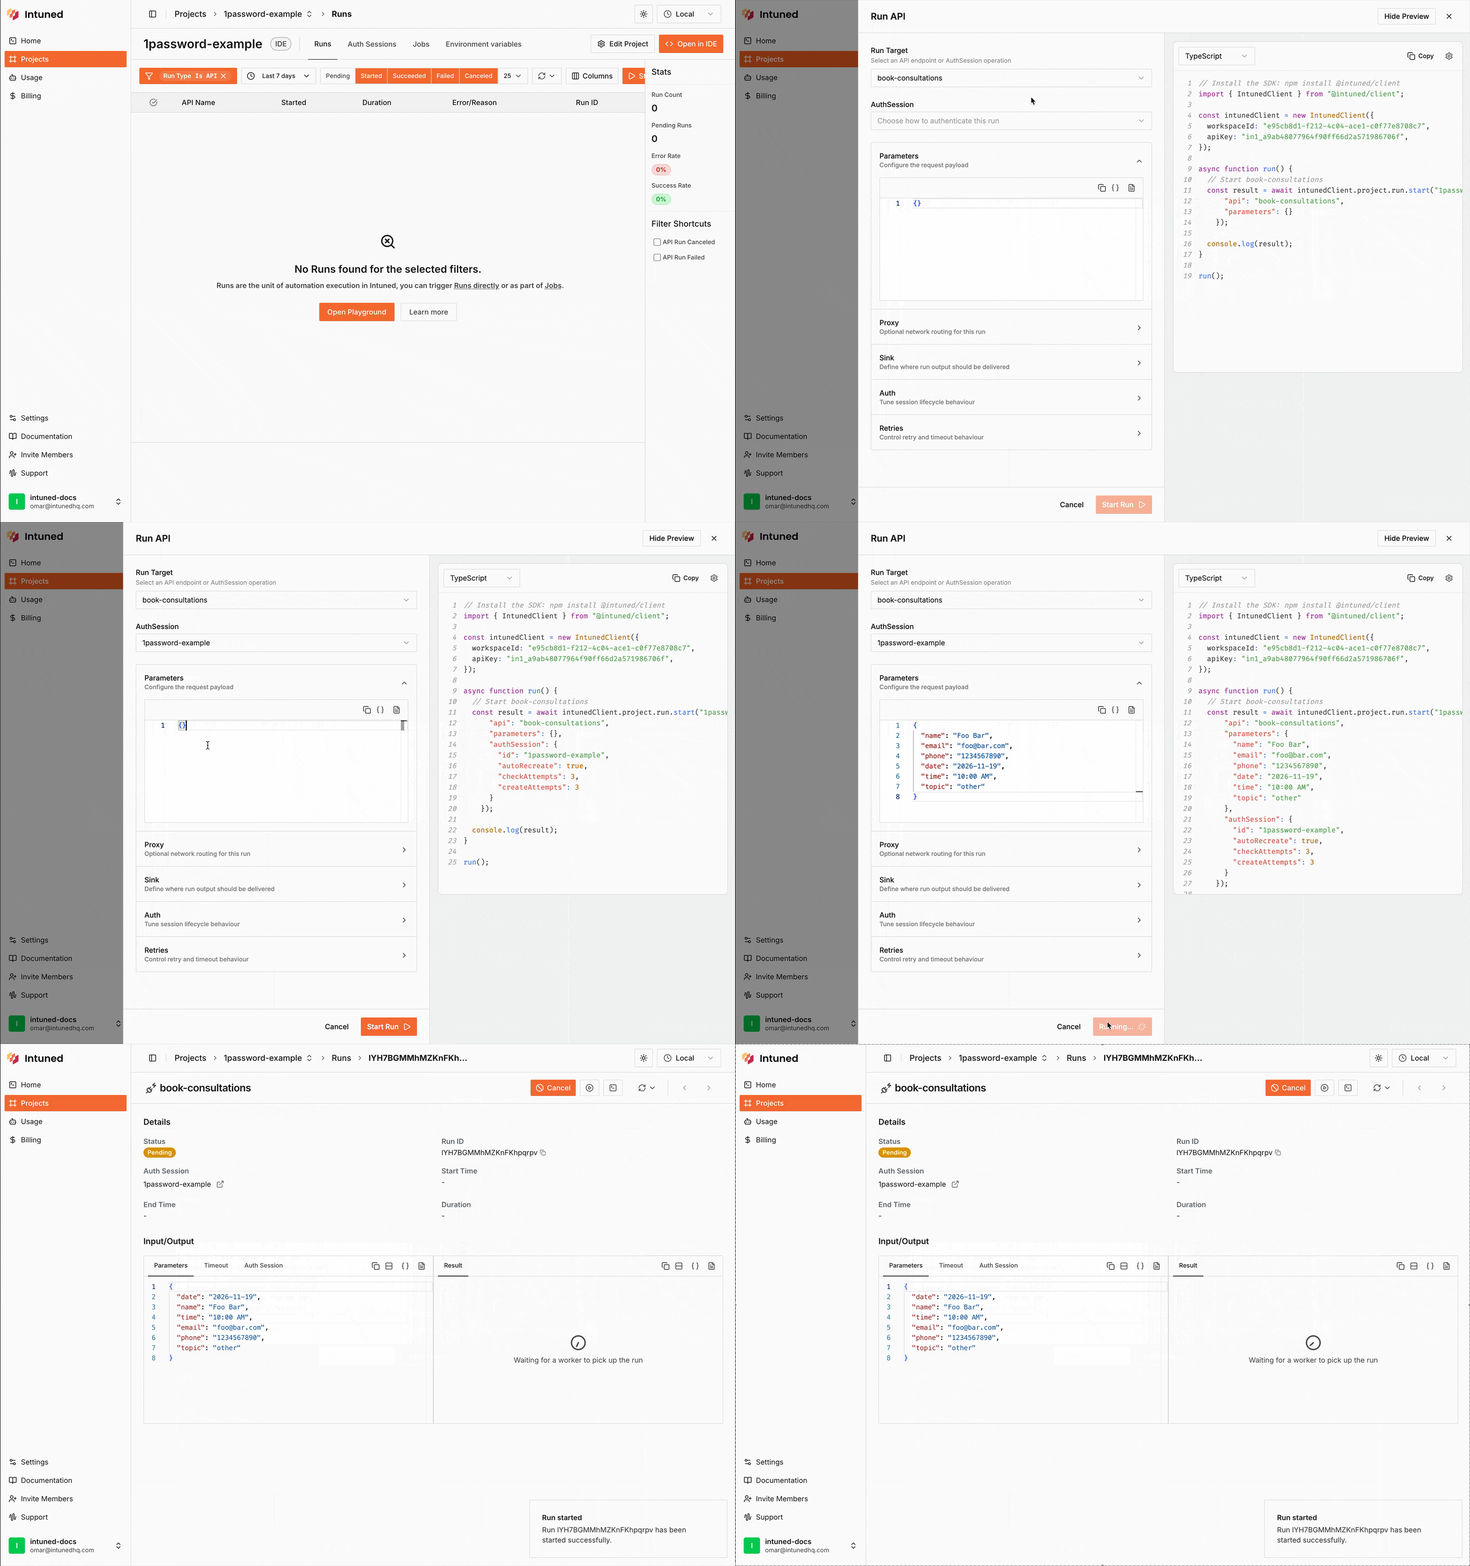
6. Use the AuthSession in your API
- API
- Dashboard (Playground)
Read credentials in your code
Insideauth-sessions/create, the parameters your function receives already hold the real values. If your code needs them elsewhere, such as in auth-sessions/check or an API, call getAuthSessionParameters (TypeScript, Python). When 1Password is enabled, it returns the values from 1Password instead of the op:// references.
Use 1Password during development
The sameop:// references work while you build and test a Project. Intuned stores the references, never the secrets, and reads the values from 1Password before each AuthSession create, check, or API run.
With the Intuned Agent
- Set
OP_SERVICE_ACCOUNT_TOKENas a workspace or Project environment variable tagged Development environment (see step 3). - In the Online IDE, enable 1Password in Intuned.json as in step 4.
- When the agent asks for credentials, enter
op://references instead of the real values.
The references are resolved only when an AuthSession runs. If the agent fills a login form directly while exploring the site, it types the reference text, not the secret.
With the CLI
Enable 1Password in your Intuned settings as in step 4, then useop:// references in your AuthSession parameter files. Before each attempt, the CLI tries these sources in order and uses the first one that resolves every reference:
OP_SERVICE_ACCOUNT_TOKENset in your shell or in the Project’s.envfile. This needs Node.js and the 1Password JavaScript SDK, installed in the Project or globally withnpm install -g @1password/sdk.- The workspace or Project
OP_SERVICE_ACCOUNT_TOKENenvironment variable tagged Development environment. A Project token takes priority over a workspace token. - The 1Password CLI (
op), using your own sign-in.
integrations.1password.enabled to false to stop resolving references.
Files on disk, such as .parameters/ and saved AuthSession instances, keep the op:// references. OP_SERVICE_ACCOUNT_TOKEN is never passed to your automation code, even when it comes from .env.
Related resources
Deploy your first authenticated RPA
Step-by-step guide to creating your first authenticated RPA project
AuthSessions
Learn more about AuthSessions in Intuned